基于Flask开发后端、VUE开发前端框架,在WEB端部署YOLOv5目标检测模型

Overview

1. 效果:

视频链接:

https://www.bilibili.com/video/BV1Wr4y1K7Sh

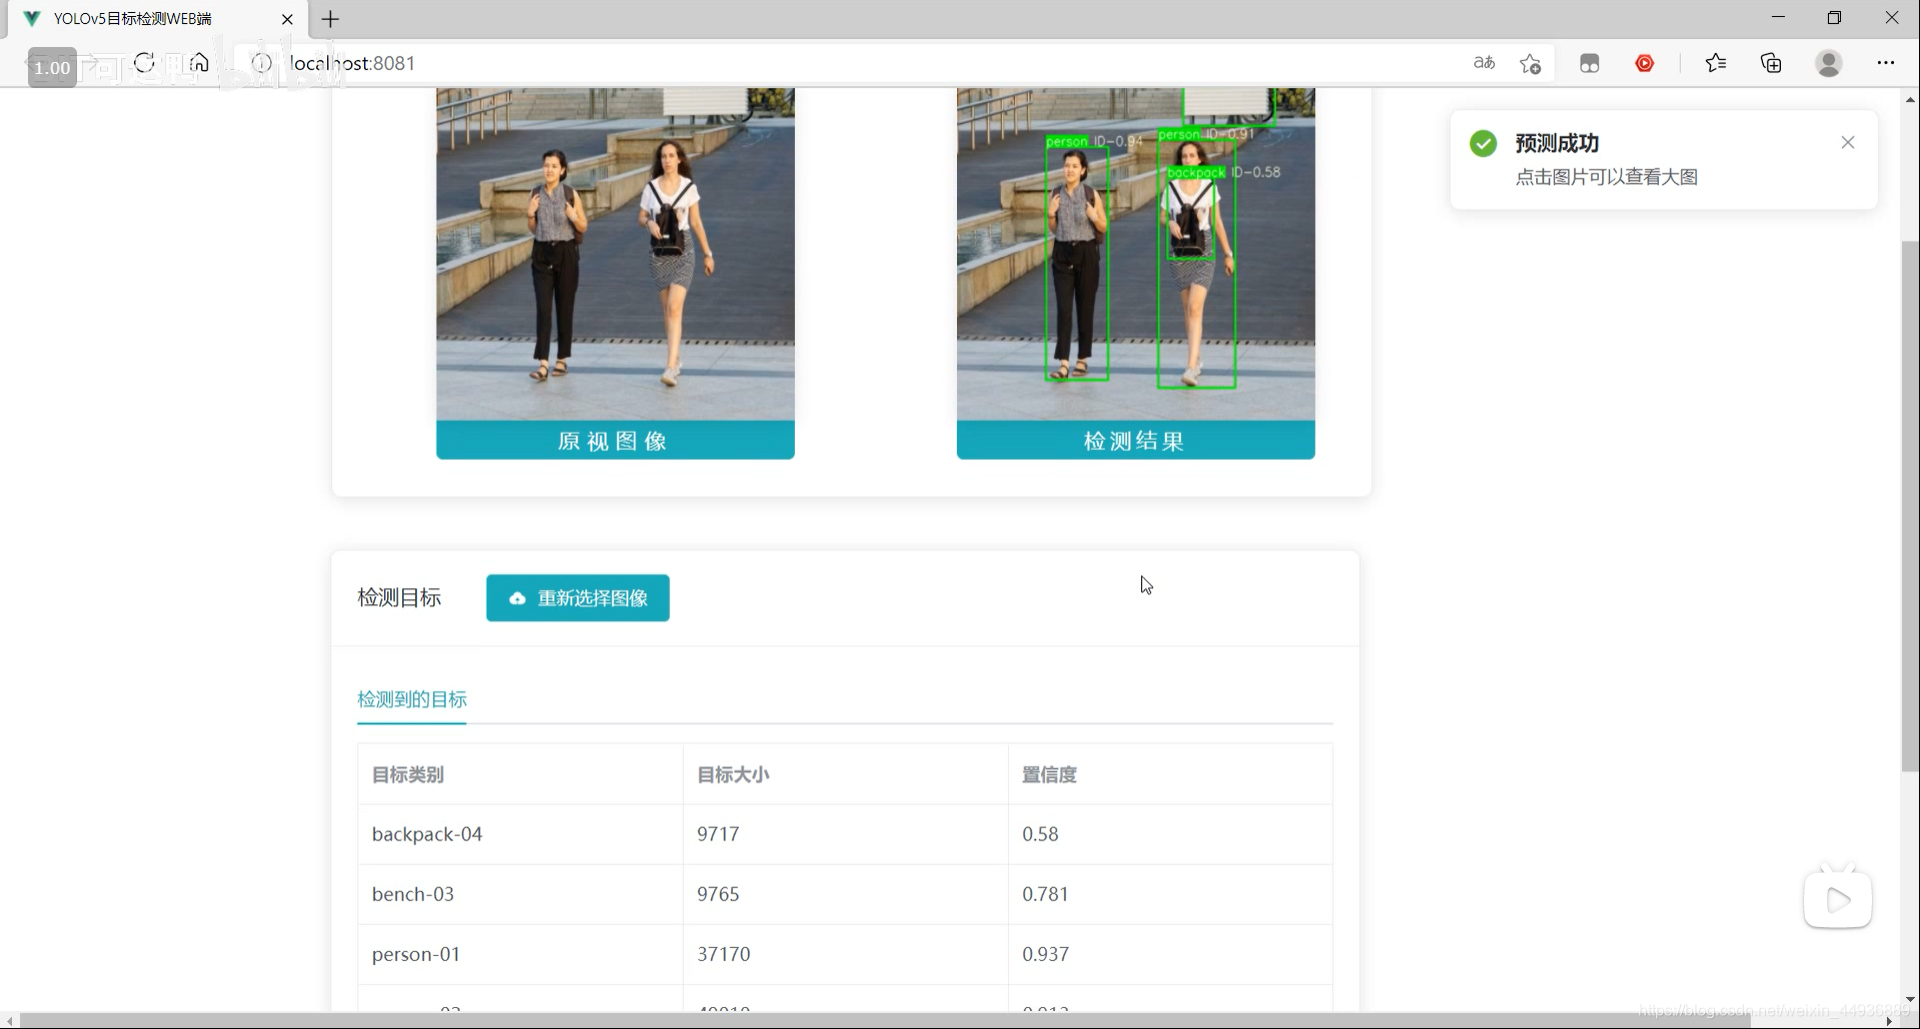
最终效果:

在这里插入图片描述

源码已经上传 Github:

https://github.com/Sharpiless/Yolov5-Flask-VUE

2. YOLOv5模型训练:

训练自己的数据集可以看我这篇博客:

【小白CV】手把手教你用YOLOv5训练自己的数据集(从Windows环境配置到模型部署)

这里演示的话我就用官方训练好的 yolov5m.pt 模型。

3. YOLOv5模型预测:

预测接口:

import torch
import numpy as np
from models.experimental import attempt_load
from utils.general import non_max_suppression, scale_coords, letterbox
from utils.torch_utils import select_device
import cv2
from random import randint


class Detector(object):

    def __init__(self):
        self.img_size = 640
        self.threshold = 0.4
        self.max_frame = 160
        self.init_model()

    def init_model(self):

        self.weights = 'weights/yolov5m.pt'
        self.device = '0' if torch.cuda.is_available() else 'cpu'
        self.device = select_device(self.device)
        model = attempt_load(self.weights, map_location=self.device)
        model.to(self.device).eval()
        model.half()
        # torch.save(model, 'test.pt')
        self.m = model
        self.names = model.module.names if hasattr(
            model, 'module') else model.names
        self.colors = [
            (randint(0, 255), randint(0, 255), randint(0, 255)) for _ in self.names
        ]

    def preprocess(self, img):

        img0 = img.copy()
        img = letterbox(img, new_shape=self.img_size)[0]
        img = img[:, :, ::-1].transpose(2, 0, 1)
        img = np.ascontiguousarray(img)
        img = torch.from_numpy(img).to(self.device)
        img = img.half()  # 半精度
        img /= 255.0  # 图像归一化
        if img.ndimension() == 3:
            img = img.unsqueeze(0)

        return img0, img

    def plot_bboxes(self, image, bboxes, line_thickness=None):
        tl = line_thickness or round(
            0.002 * (image.shape[0] + image.shape[1]) / 2) + 1  # line/font thickness
        for (x1, y1, x2, y2, cls_id, conf) in bboxes:
            color = self.colors[self.names.index(cls_id)]
            c1, c2 = (x1, y1), (x2, y2)
            cv2.rectangle(image, c1, c2, color,
                          thickness=tl, lineType=cv2.LINE_AA)
            tf = max(tl - 1, 1)  # font thickness
            t_size = cv2.getTextSize(
                cls_id, 0, fontScale=tl / 3, thickness=tf)[0]
            c2 = c1[0] + t_size[0], c1[1] - t_size[1] - 3
            cv2.rectangle(image, c1, c2, color, -1, cv2.LINE_AA)  # filled
            cv2.putText(image, '{} ID-{:.2f}'.format(cls_id, conf), (c1[0], c1[1] - 2), 0, tl / 3,
                        [225, 255, 255], thickness=tf, lineType=cv2.LINE_AA)
        return image

    def detect(self, im):

        im0, img = self.preprocess(im)

        pred = self.m(img, augment=False)[0]
        pred = pred.float()
        pred = non_max_suppression(pred, self.threshold, 0.3)

        pred_boxes = []
        image_info = {}
        count = 0
        for det in pred:
            if det is not None and len(det):
                det[:, :4] = scale_coords(
                    img.shape[2:], det[:, :4], im0.shape).round()

                for *x, conf, cls_id in det:
                    lbl = self.names[int(cls_id)]
                    x1, y1 = int(x[0]), int(x[1])
                    x2, y2 = int(x[2]), int(x[3])
                    pred_boxes.append(
                        (x1, y1, x2, y2, lbl, conf))
                    count += 1
                    key = '{}-{:02}'.format(lbl, count)
                    image_info[key] = ['{}×{}'.format(
                        x2-x1, y2-y1), np.round(float(conf), 3)]

        im = self.plot_bboxes(im, pred_boxes)
        return im, image_info

处理完保存到服务器本地临时的目录下:

import os

def pre_process(data_path):
    file_name = os.path.split(data_path)[1].split('.')[0]
    return data_path, file_name
import cv2

def predict(dataset, model, ext):
    global img_y
    x = dataset[0].replace('\\', '/')
    file_name = dataset[1]
    print(x)
    print(file_name)
    x = cv2.imread(x)
    img_y, image_info = model.detect(x)
    cv2.imwrite('./tmp/draw/{}.{}'.format(file_name, ext), img_y)
    return image_info
from core import process, predict


def c_main(path, model, ext):
    image_data = process.pre_process(path)
    image_info = predict.predict(image_data, model, ext)

    return image_data[1] + '.' + ext, image_info


if __name__ == '__main__':
    pass

4. Flask 部署:

然后通过Flask框架写相应函数:

@app.route('/upload', methods=['GET', 'POST'])
def upload_file():
    file = request.files['file']
    print(datetime.datetime.now(), file.filename)
    if file and allowed_file(file.filename):
        src_path = os.path.join(app.config['UPLOAD_FOLDER'], file.filename)
        file.save(src_path)
        shutil.copy(src_path, './tmp/ct')
        image_path = os.path.join('./tmp/ct', file.filename)
        pid, image_info = core.main.c_main(
            image_path, current_app.model, file.filename.rsplit('.', 1)[1])
        return jsonify({'status': 1,
                        'image_url': 'http://127.0.0.1:5003/tmp/ct/' + pid,
                        'draw_url': 'http://127.0.0.1:5003/tmp/draw/' + pid,
                        'image_info': image_info})

    return jsonify({'status': 0})

这样前端发出POST请求时,会对上传的图像进行处理。

5. VUE前端:

主要是通过VUE编写前端WEB框架。

核心前后端交互代码:

	// 上传文件
    update(e) {
      this.percentage = 0;
      this.dialogTableVisible = true;
      this.url_1 = "";
      this.url_2 = "";
      this.srcList = [];
      this.srcList1 = [];
      this.wait_return = "";
      this.wait_upload = "";
      this.feature_list = [];
      this.feat_list = [];
      this.fullscreenLoading = true;
      this.loading = true;
      this.showbutton = false;
      let file = e.target.files[0];
      this.url_1 = this.$options.methods.getObjectURL(file);
      let param = new FormData(); //创建form对象
      param.append("file", file, file.name); //通过append向form对象添加数据
      var timer = setInterval(() => {
        this.myFunc();
      }, 30);
      let config = {
        headers: { "Content-Type": "multipart/form-data" },
      }; //添加请求头
      axios
        .post(this.server_url + "/upload", param, config)
        .then((response) => {
          this.percentage = 100;
          clearInterval(timer);
          this.url_1 = response.data.image_url;
          this.srcList.push(this.url_1);
          this.url_2 = response.data.draw_url;
          this.srcList1.push(this.url_2);
          this.fullscreenLoading = false;
          this.loading = false;

          this.feat_list = Object.keys(response.data.image_info);

          for (var i = 0; i < this.feat_list.length; i++) {
            response.data.image_info[this.feat_list[i]][2] = this.feat_list[i];
            this.feature_list.push(response.data.image_info[this.feat_list[i]]);
          }

          this.feature_list.push(response.data.image_info);
          this.feature_list_1 = this.feature_list[0];
          this.dialogTableVisible = false;
          this.percentage = 0;
          this.notice1();
        });
    },

这段代码在点击提交图片时响应:

		<div slot="header" class="clearfix">
            <span>检测目标span>
            <el-button
              style="margin-left: 35px"
              v-show="!showbutton"
              type="primary"	
              icon="el-icon-upload"
              class="download_bt"
              v-on:click="true_upload2"
            >
              重新选择图像
              <input
                ref="upload2"
                style="display: none"
                name="file"
                type="file"
                @change="update"
              />
            el-button>
          div>

6. 启动项目:

在 Flask 后端项目下启动后端代码:

python app.py

在 VUE 前端项目下,先安装依赖:

npm install

然后运行前端:

npm run serve

然后在浏览器打开localhost即可:

在这里插入图片描述

关注我的公众号:

感兴趣的同学关注我的公众号——可达鸭的深度学习教程:

在这里插入图片描述

Owner
BIT可达鸭
Where2Act: From Pixels to Actions for Articulated 3D Objects

Where2Act: From Pixels to Actions for Articulated 3D Objects The Proposed Where2Act Task. Given as input an articulated 3D object, we learn to propose

Kaichun Mo 69 Nov 28, 2022
A real-time speech emotion recognition application using Scikit-learn and gradio

Speech-Emotion-Recognition-App A real-time speech emotion recognition application using Scikit-learn and gradio. Requirements librosa==0.6.3 numpy sou

Son Tran 6 Oct 04, 2022
Pytorch Implementation of the paper "Cross-domain Correspondence Learning for Exemplar-based Image Translation"

CoCosNet Pytorch Implementation of the paper "Cross-domain Correspondence Learning for Exemplar-based Image Translation" (CVPR 2020 oral). Update: 202

Lingbo Yang 38 Sep 22, 2021
DALL-Eval: Probing the Reasoning Skills and Social Biases of Text-to-Image Generative Transformers

DALL-Eval: Probing the Reasoning Skills and Social Biases of Text-to-Image Generative Transformers Authors: Jaemin Cho, Abhay Zala, and Mohit Bansal (

Jaemin Cho 98 Dec 15, 2022
Image Super-Resolution Using Very Deep Residual Channel Attention Networks

Image Super-Resolution Using Very Deep Residual Channel Attention Networks

kongdebug 14 Oct 14, 2022
DeepConsensus uses gap-aware sequence transformers to correct errors in Pacific Biosciences (PacBio) Circular Consensus Sequencing (CCS) data.

DeepConsensus DeepConsensus uses gap-aware sequence transformers to correct errors in Pacific Biosciences (PacBio) Circular Consensus Sequencing (CCS)

Google 149 Dec 19, 2022
Deepface is a lightweight face recognition and facial attribute analysis (age, gender, emotion and race) framework for python

deepface Deepface is a lightweight face recognition and facial attribute analysis (age, gender, emotion and race) framework for python. It is a hybrid

Kushal Shingote 2 Feb 10, 2022
Official PyTorch implementation of Segmenter: Transformer for Semantic Segmentation

Segmenter: Transformer for Semantic Segmentation Segmenter: Transformer for Semantic Segmentation by Robin Strudel*, Ricardo Garcia*, Ivan Laptev and

594 Jan 06, 2023
Implementation of TimeSformer, a pure attention-based solution for video classification

TimeSformer - Pytorch Implementation of TimeSformer, a pure and simple attention-based solution for reaching SOTA on video classification.

Phil Wang 602 Jan 03, 2023
NeRD: Neural Reflectance Decomposition from Image Collections

NeRD: Neural Reflectance Decomposition from Image Collections Project Page | Video | Paper | Dataset Implementation for NeRD. A novel method which dec

Computergraphics (University of Tübingen) 195 Dec 29, 2022
ProFuzzBench - A Benchmark for Stateful Protocol Fuzzing

ProFuzzBench - A Benchmark for Stateful Protocol Fuzzing ProFuzzBench is a benchmark for stateful fuzzing of network protocols. It includes a suite of

155 Jan 08, 2023
Tool for installing and updating MiSTer cores and other files

MiSTer Downloader This tool installs and updates all the cores and other extra files for your MiSTer. It also updates the menu core, the MiSTer firmwa

72 Dec 24, 2022
ONNX Command-Line Toolbox

ONNX Command Line Toolbox Aims to improve your experience of investigating ONNX models. Use it like onnx infershape /path/to/model.onnx. (See the usag

黎明灰烬 (王振华 Zhenhua WANG) 23 Nov 13, 2022
Easily benchmark PyTorch model FLOPs, latency, throughput, max allocated memory and energy consumption

⏱ pytorch-benchmark Easily benchmark model inference FLOPs, latency, throughput, max allocated memory and energy consumption Install pip install pytor

Lukas Hedegaard 21 Dec 22, 2022
This is the official pytorch implementation of Student Helping Teacher: Teacher Evolution via Self-Knowledge Distillation(TESKD)

Student Helping Teacher: Teacher Evolution via Self-Knowledge Distillation (TESKD) By Zheng Li[1,4], Xiang Li[2], Lingfeng Yang[2,4], Jian Yang[2], Zh

Zheng Li 9 Sep 26, 2022
[ICCV 2021 Oral] NerfingMVS: Guided Optimization of Neural Radiance Fields for Indoor Multi-view Stereo

NerfingMVS Project Page | Paper | Video | Data NerfingMVS: Guided Optimization of Neural Radiance Fields for Indoor Multi-view Stereo Yi Wei, Shaohui

Yi Wei 369 Dec 24, 2022
An Implementation of Transformer in Transformer in TensorFlow for image classification, attention inside local patches

Transformer-in-Transformer An Implementation of the Transformer in Transformer paper by Han et al. for image classification, attention inside local pa

Rishit Dagli 40 Jul 25, 2022
Simple tools for logging and visualizing, loading and training

TNT TNT is a library providing powerful dataloading, logging and visualization utilities for Python. It is closely integrated with PyTorch and is desi

1.5k Jan 02, 2023
PyTorch implementation of PSPNet

PSPNet with PyTorch Unofficial implementation of "Pyramid Scene Parsing Network" (https://arxiv.org/abs/1612.01105). This repository is just for caffe

Kazuto Nakashima 52 Nov 16, 2022
Weak-supervised Visual Geo-localization via Attention-based Knowledge Distillation

Weak-supervised Visual Geo-localization via Attention-based Knowledge Distillation Introduction WAKD is a PyTorch implementation for our ICPR-2022 pap

2 Oct 20, 2022