MagInkCal
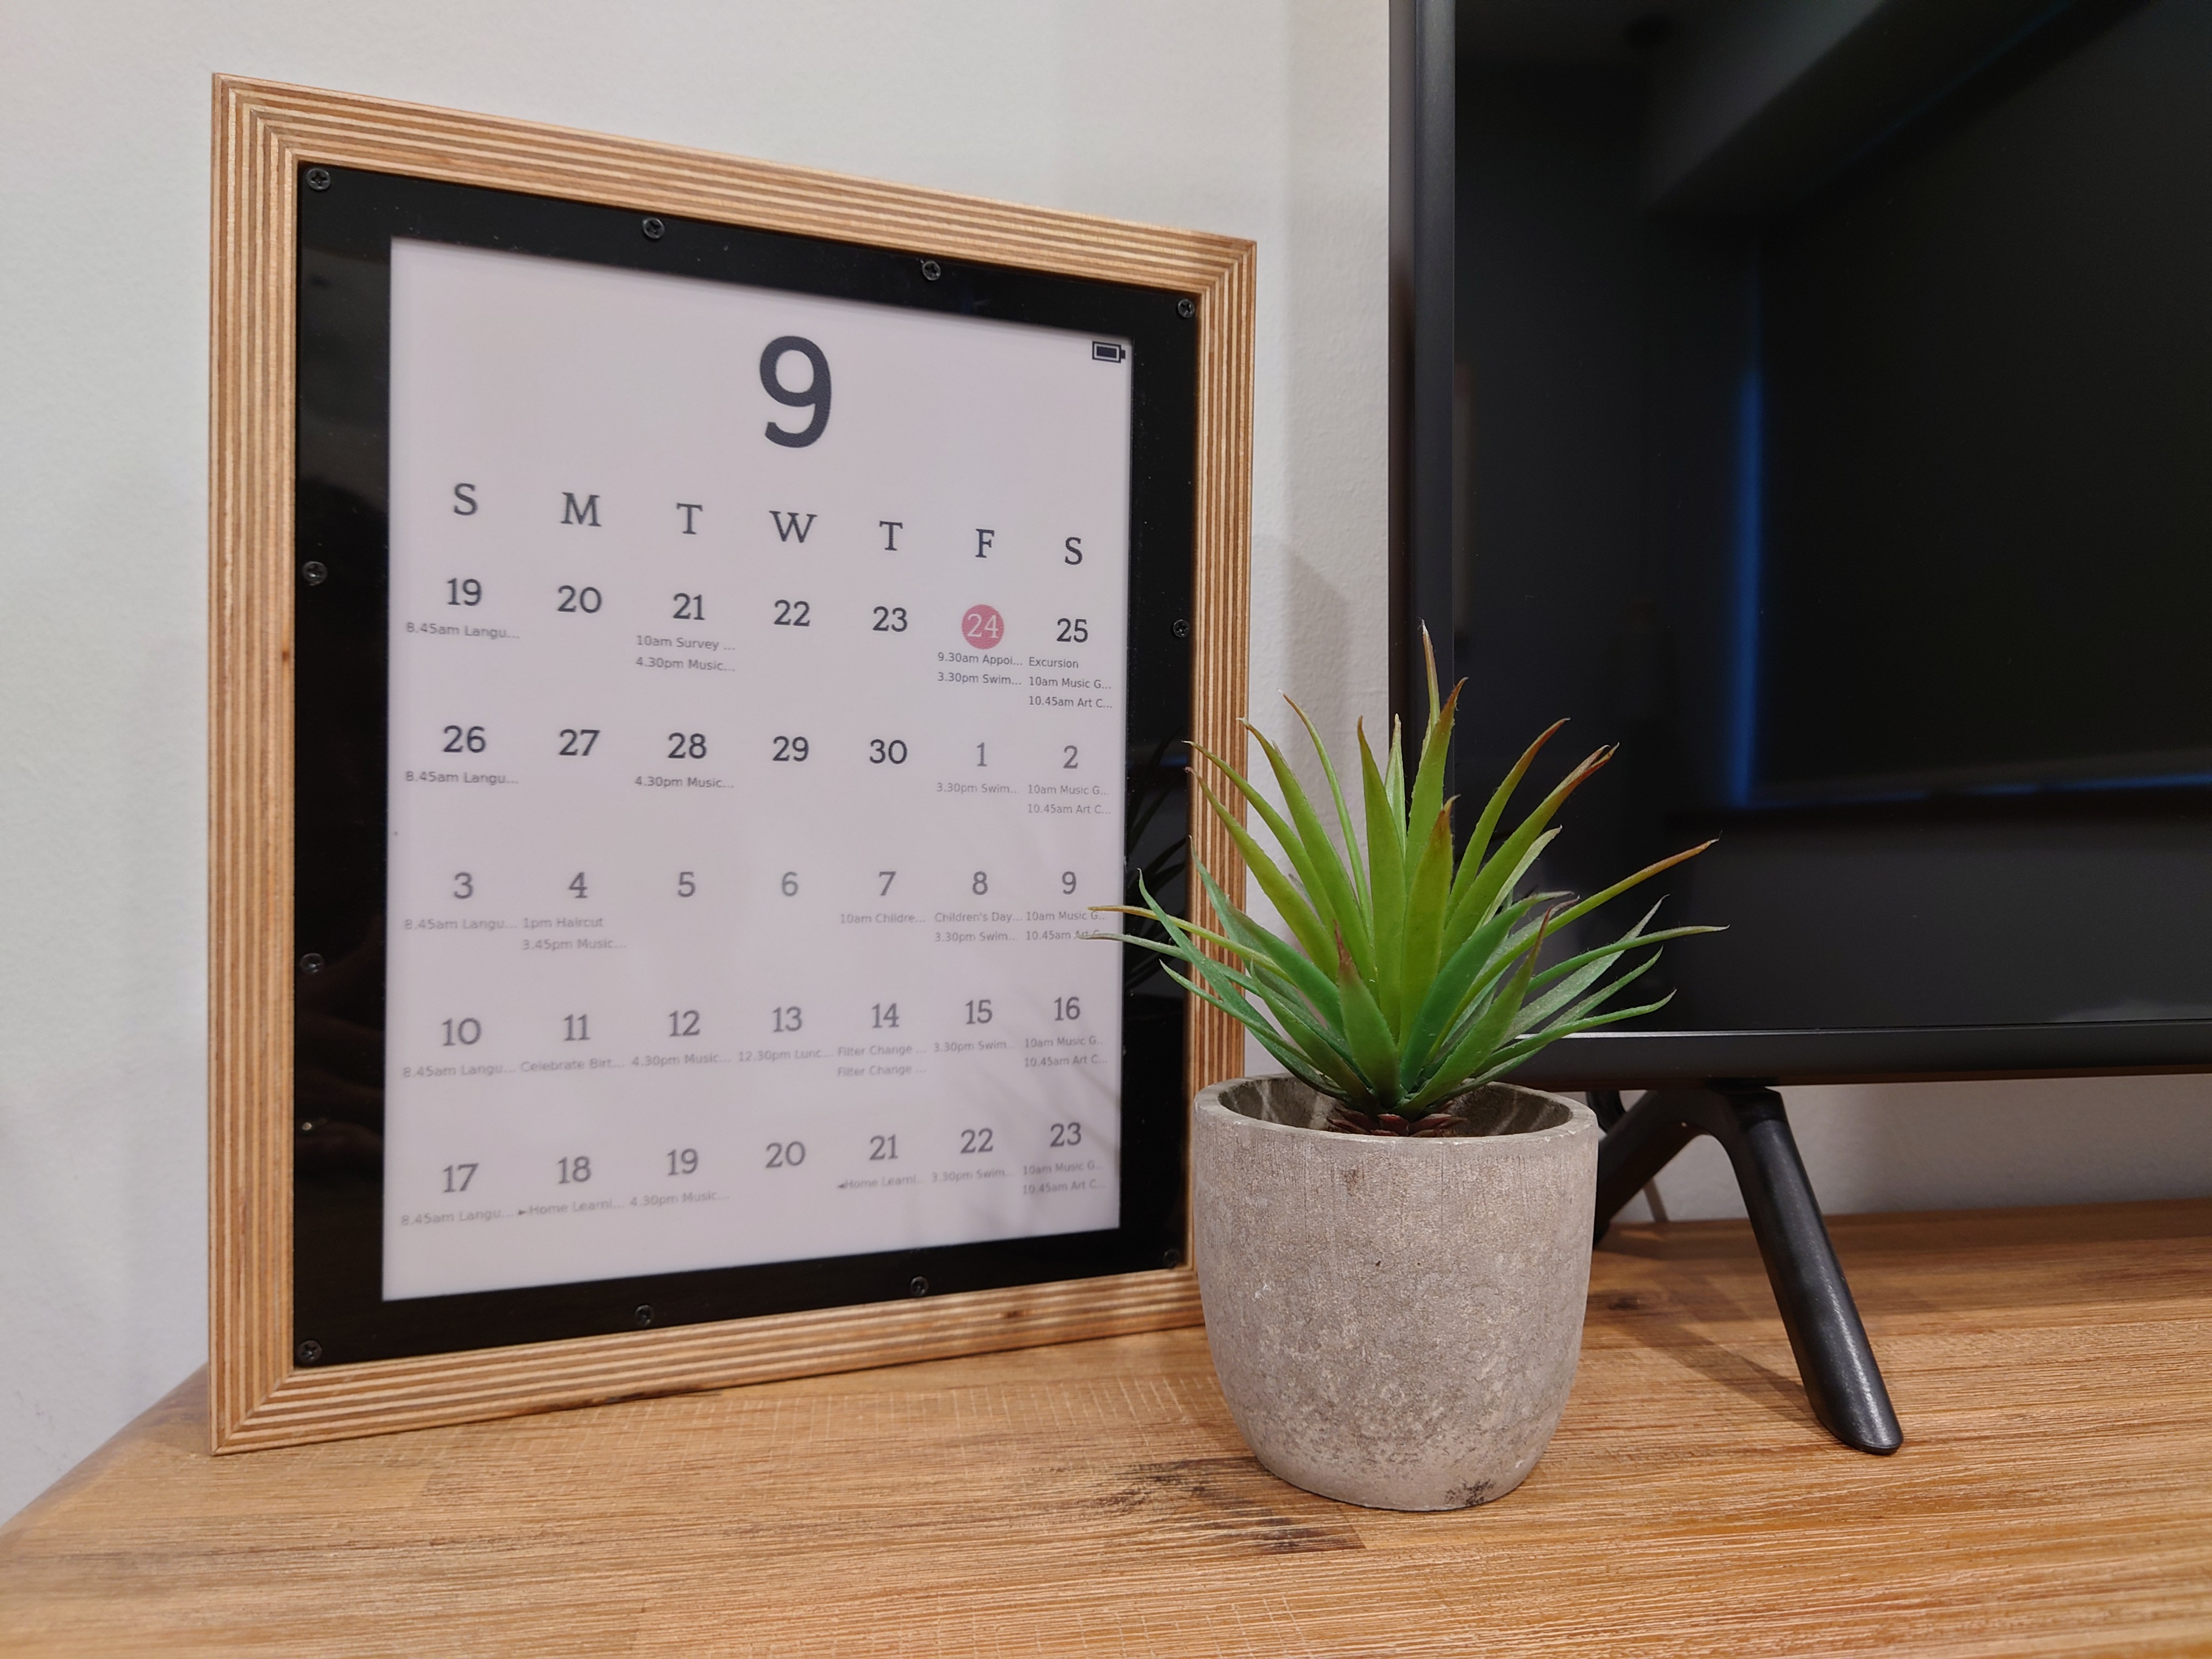
This repo contains the code needed to drive an E-Ink Magic Calendar that uses a battery powered (PiSugar2) Raspberry Pi Zero WH to retrieve events from a Google Calendar, format it into the desired layout, before pushing it to a Waveshare 12.48" tri-color E-Ink display. Note that the code has only been tested on the specific hardware mentioned, and customization of the code is necessary for it to work with other E-Ink displays or Battery/RTC add-ons. That said, enjoy working on your project and hopefully this helps to jump-start your magic calendar journey.
Background
Back in 2019, I started a thread in Reddit to bounce an idea I had with the community: to replicate the Android Magic Calendar concept that inspired many DIY projects in the subsequent years. But specifically, I wanted it to run on battery so I could position it anywhere in house, and even hang it on the wall without a wire dangling beneath it. I also wanted the parts to be plug and play since I had neither the desire nor the steady hands needed to solder anything. After sitting on that idea for close to a year, I finally got my act together and ordered the parts I needed for this project. I posted another update to Reddit in 2020, but got overwhelmed with life/work so it took me almost another year before posting the full set of instructions and code here. An update was also posted on Reddit to share this with the community.
Hardware Required
- Raspberry Pi Zero WH - Header pins are needed to connect to the E-Ink display
- Waveshare 12.48" Tri-color E-Ink Display - Unfortunately out of stock at the time this is published
- PiSugar2 for Raspberry Pi Zero (Tindie) - Provides the RTC and battery for this project
How It Works
Through PiSugar2's web interface, the onboard RTC can be set to wake and trigger the RPi to boot up daily at a time of your preference. Upon boot, a cronjob on the RPi is triggered to run a Python script that fetches calendar events from Google Calendar for the next few weeks, and formats them into the desired layout before displaying it on the E-Ink display. The RPi then shuts down to conserve battery. The calendar remains displayed on the E-Ink screen, because well, E-Ink...
Some features of the calendar:
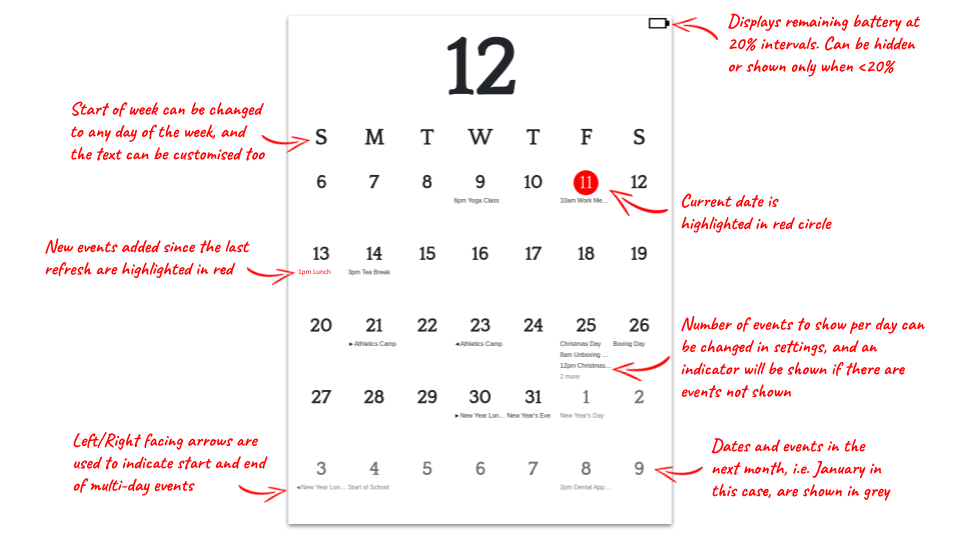
- Battery life is the big question so I'll address it first. I'm getting around 3-4 weeks before needing to recharge the PiSugar2. I'm fairly happy with this but I'm sure this can be extended if I optimize the code further.
- Since I had the luxury of using red for the E-Ink display, I used it to highlight the current date, as well as recently added/updated events.
- I don't like having long bars that span across multiple days for multi-day events, so I chose to display only the start and end dates for those events, and adding small left/right arrows accordingly,
- Given limited space (oh why are large E-Ink screens still so expensive!) and resolution on the display, I could only show 3 events per day and an indicator (e.g. 4 more) for those not displayed
- The calendar always starts from the current week, and displays the next four (total 35 days). If the dates cross over to the new month, it's displayed in grey instead of black.
Setting Up Raspberry Pi Zero
-
Start by flashing Raspberrypi OS Lite to a MicroSD Card.
-
After setting up the OS, run the following commmand in the RPi Terminal, and use the raspi-config interface to setup Wifi connection, enable SSH, I2C, SPI, and set the timezone to your location.
sudo raspi-config
- Run the following commands in the RPi Terminal to setup the environment to run the Python scripts.
sudo apt update
sudo apt-get install python3-pip
sudo apt-get install chromium-chromedriver
pip3 install --upgrade google-api-python-client google-auth-httplib2 google-auth-oauthlib
pip3 install pytz
pip3 install selenium
pip3 install Pillow
- Run the following commands in the RPi Terminal to install the libraries needed to drive the E-Ink display. See this page for more details.
sudo apt-get install python3-pil
sudo pip3 install RPi.GPIO
sudo pip3 install spidev
- Run the following commands in the RPi Terminal to install the web interface for PiSugar2 display. See this page for more details. After running the command, you would be able to access the web interface at http://your_raspberry_ip:8421 in your browser. From there you should be able specify when you wish to schedule the PiSugar2 boot up your RPi.
curl http://cdn.pisugar.com/release/Pisugar-power-manager.sh | sudo bash
-
Download the over the files in this repo to a folder in your PC first.
-
In order for you to access your Google Calendar events, it's necessary to first grant the access. Follow the instructions here on your PC to get the credentials.json file from your Google API. Don't worry, take your time. I'll be waiting here.
-
Once done, copy the credentials.json file to the "gcal" folder in this project. Run the following command on your PC. A web browser should appear, asking you to grant access to your calendar. Once done, you should see a "token.pickle" file in your "gcal" folder.
python3 quickstart.py
-
Copy all the files over to your RPi using your preferred means.
-
Run the following command in the RPi Terminal to open crontab.
crontab -e
- Specifically, add the following command to crontab so that the MagInkCal Python script runs each time the RPi is booted up.
@reboot cd /location/to/your/maginkcal && python3 maginkcal.py
- That's all! Your Magic Calendar should now be refreshed at the time interval that you specified in the PiSugar2 web interface!
PS: I'm aware that the instructions above may not be complete, especially when it comes to the Python libraries to be installed, so feel free to ping me if you noticed anything missing and I'll add it to the steps above.
Acknowledgements
- Quattrocento Font: Font used for the calendar display
- Bootstrap Calendar CSS: Stylesheet that adapted heavily for the calendar display
- emagra: For adding in new features, such as 24hr display and multiple calendar selection.
- /u/aceisace: For the tips on E-Ink development and the InkyCal repo (worth checking out even though I didn't use it for this project).
Contributing
I won't be updating this code much, since it has been serving me well. Nevertheless, feel free to fork the repo and modify it for your own purpose. At the same time, check out other similar projects, such as InkyCal. It's much more polished and also actively developed.
What's Next
Honestly, the cost of this project is way too high for a single purpose device. Personally, I've been looking at E-Ink tablets that emulate the experience of writing on paper, and allow the users to take notes on the go. Those familiar with this range of products would be aware of the reMarkable tablet, Ratta Supernote, Kobo Elipsa and many others. My next project is likely to enhance one of these devices such that the calendar will be displayed when it's not in use. While this is usually possible by manually setting the sleep screen image / screensaver, I'm looking to have the screensaver updated automatically on a daily basis, like how it was done in this project.

 40 Jan 05, 2023
 18 Dec 15, 2022
 238 Jan 08, 2023
 16 Oct 22, 2022
 26 Dec 19, 2022
 45 Jan 02, 2023
 3.2k Jan 04, 2023
 19 Dec 29, 2022
 23 Nov 24, 2022
 76 Jan 04, 2023
 6 Dec 13, 2022
 3 Feb 01, 2022
 13 Jan 02, 2023
 2 Nov 16, 2021
 2 Jan 04, 2022
 6 Apr 20, 2022
 3 Feb 19, 2022
 3 Oct 08, 2022
 4 Jun 09, 2022
 84 Dec 30, 2022