当前位置:网站首页>Neural network learning notes 2.2 -- write a simple convolution neural network image classifier with MATLAB
Neural network learning notes 2.2 -- write a simple convolution neural network image classifier with MATLAB
2022-07-19 03:33:00 【Oreo is delicious】
Supporting video explanation
10 Minutes to learn matlab Realization cnn Image classification _ Bili, Bili _bilibili
10 Minutes to learn matlab Realization cnn Image classification
The overall code
link :https://pan.baidu.com/s/1btnY-jZXMK9oj3ZQxDvz8g
Extraction code :k4v8
You can open the code , Let me explain it step by step , Meaning of each step , And how you should use !
Catalog
1.3 edge detection ( The core of convolution )
1.4 The law of abandonment (Dropout Method)
1.5 softmax( Multiple classifiers )
2. adopt Matlab Realize a simple convolutional neural network classification
2.3 Define the network framework ( It is suggested to watch the video at the top of the article )
2.5 Test the network for accuracy prediction
1. For the sake of understanding , Here are some basic concepts , Yes, skip the program directly later
1.1 The channel number
Each picture is made up of red, green and blue , When importing, it corresponds to red, green and blue channels , That is, three matrices , These three matrices represent the strength values of the corresponding red, green and blue pixels .
1.2 Fully connected layer
Pull the last matrix of convolution into a one-dimensional matrix , Then there is the simplest neural network model layer by layer , The middle is connected by weight .
1.3 edge detection ( The core of convolution )
Edge detection mainly uses convolution kernel to extract image features , For example, there are those that pass the vertical edge detection , Or horizontal edge inspection
1.4 The law of abandonment (Dropout Method)

among m ∈ {0,1}^d Is to discard the mask (dropout mask), By taking probability as p The Bayesian effort distribution is randomly generated .

( The above pictures and concepts come from teacher Qiu's God will network ppt The chapter of regularization )
In short, it is through incomplete invocation of nodes , Regularize , The purpose is to prevent the model from over fitting
1.5 softmax( Multiple classifiers )
If you use Softmax Regression classifier , Equivalent to the last layer of the network C Neurons , Its output process Softmax The normalized function can be used as the conditional probability of each class .
Is to get the probability of each event output , And then class Determine the category together
2. adopt Matlab Realize a simple convolutional neural network classification
Here is matlab An example of convolution image classification provided in , Let me explain in detail how each step of the model comes , And explain how we can set it according to our own data set
2.1 Load data
Load the digital sample data as image data storage .
The annotated line here adds the file address , We can add ‘c:’ That's what it means c disc , Click the single quotation mark in the back to the middle to select the address .
imageDatastore Function automatically labels the image according to the folder name .
digitDatasetPath = fullfile(matlabroot,'toolbox','nnet','nndemos', ...
    'nndatasets','DigitDataset');
% digitDatasetPath = fullfile('','','','','');

imds = imageDatastore(digitDatasetPath, ...
    'IncludeSubfolders',true, ...
'LabelSource','foldernames'); 
Open the data set, which is like this , The file name is the label , Inside is the data of handwritten digits
The label here doesn't have to be a number , For example, when I was doing it, there was the English of the corresponding fault classification name , I haven't tried Chinese , I don't think most of them support .
2.2 Divide the data set
Divide the data into training data set and verification data set , So that each category in the training set contains 750 Images , And the validation set contains the remaining images corresponding to each tag .splitEachLabel Split the image data store into two new data stores for training and verification .
here 750 Is the number of training sets , Here we need to pay attention to , This number should not be greater than the minimum number in each folder , Otherwise, it will report a mistake , hinder randomize It's just to take randomly , It's convenient that you don't need to disturb manually .
numTrainFiles = 750;
[imdsTrain,imdsValidation] = splitEachLabel(imds,numTrainFiles,'randomize');
2.3 Define the network framework ( It is suggested to watch the video at the top of the article )
Define convolutional neural network architecture . Specify the size of the image in the network input layer and the number of classes in the full connection layer in front of the classification layer . Each image is 28×28×1 Pixels , Yes 10 Classes .
inputSize = [28 28 1];
numClasses = 10;

layers = [
    imageInputLayer(inputSize)
    convolution2dLayer(5,20)
    batchNormalizationLayer
    reluLayer
    fullyConnectedLayer(numClasses)
    softmaxLayer
    classificationLayer];
Through here matlab The toolbox can write the network structure through modular design, which is comfortable without typing code
deepNetworkDesignerEnter this code in the command window on the left , Will open this editor
The network structure in the above code segment makes it look like this
 Then click generate code above to get the network structure in our code segment above .
Then the setting of network parameters
Here, set the network parameters, such as the number of iterations , There are also pictures showing the training process , wait , If there are no special requirements, you can directly use the parameters I set here , If the training results are not good , And every time, it is practical to train to the maximum round rather than the minimum error , At this time, you can change the number of training rounds
If there are other functions that need to be implemented, you can enter them in the command window help trainingOptions Open the settings document , And then through Ctrl+F Shortcut key to find the function you need according to this ‘ Function name ’‘ Parameters ’ The format of is added here .
options = trainingOptions('sgdm', ...
    'MaxEpochs',4, ...
    'ValidationData',imdsValidation, ...
    'ValidationFrequency',30, ...
    'Verbose',false, ...
    'Plots','training-progress');
2.4 Network training
net = trainNetwork(imdsTrain,layers,options);Inside the brackets are ( Training data , Network structure , Training parameters )
Then the training chart will appear during training

Above is the accuracy , The following is the calculation loss, that is, the error
2.5 Test the network for accuracy prediction
YPred = classify(net,imdsValidation);
YValidation = imdsValidation.Labels;
accuracy = mean(YPred == YValidation)
The three lines of code respectively get the predicted value through the network , Get the label corresponding to the prediction result , Judge whether the prediction result is the same as the real label to calculate the accuracy .
边栏推荐
- Comparison between redis and other databases
- Ubuntu clear CUDA cache
- 未知宽高元素实现水平垂直居中的方法
- leetcode 222. 完全二叉树的节点个数(必会)
- Unity解决同材质物体重叠产生Z-Fighting的问题
- Ncnn thread
- oracle 关闭回收站
- Vscode+ros2 environment configuration
- Solve the error of 0x00000709 when win10 connects to the shared printer
- 2022-07-16: what is the output of the following go language code? A:[]; B:[5]; C:[5 0 0 0 0]; D:[0 0 0 0 0]。 package main import ( “fmt“ )
猜你喜欢

Wechat applet -- Summary of problems in the actual development of taro framework

Code demonstration of fcos face detection model in openvino
Polynomial interpolation fitting (I)

MYSQL主从搭建

Vs code problem: launch:program '... \ vscode\launch. exe‘ dose not exist

Es6 notes d'étude - station B Xiao Ma Ge
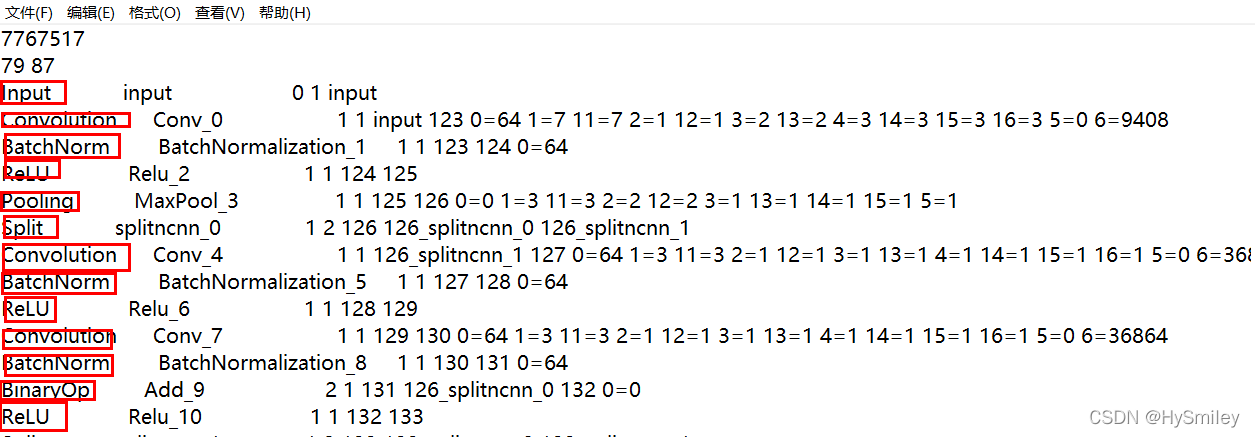
Visual analysis of ncnn param file and bin model
ES6学习笔记——B站小马哥

洛谷每日三题之第三天(第四天补做)

Is there really no way out for functional testing? 10K capping is never a joke
随机推荐
Yolov6 learning first chapter
【剑指Offer】31-35题(判断一个序列是否是栈的出栈序列之一,层序打印二叉树以及分行打印、每行逆着打印),判断序列是否是二叉搜索树的后序遍历路径,二叉树找一条权值为K的路径,复制复杂链表
Polynomial interpolation fitting (II)
leetcode 222. 完全二叉树的节点个数(必会)
Need to slow down a little
箭头函数与this指向详解
Rtx3090 installing pytorch3d
It's good to take more exercise
374. 猜数字大小(入门 必会)
2022-07-16:以下go语言代码输出什么?A:[];B:[5];C:[5 0 0 0 0];D:[0 0 0 0 0]。 package main import ( “fmt“ )
基于MFC如何实现单个文档的文件读写
Chengxin University envi_ The second week of IDL experiment content: extract aod+ in all MODIS aerosol products for detailed analysis
In depth understanding of machine learning - unbalanced learning: sample sampling technology - [smote sampling method and borderline smote sampling method of manual sampling technology]
By voting for the destruction of STI by Dao, seektiger is truly community driven
Chengxin University envi_ IDL first week experiment test: simple operation of array + detailed analysis
Labelme starts normally, but cannot be opened
Game theory of catching lice
oracle 查询 主机名和对应的IP地址
[NoSQL] redis high availability and persistence
05 central processing unit