Me cleaner - Tool for partial deblobbing of Intel ME/TXE firmware images

Overview

me_cleaner Donation

me_cleaner is a Python script able to modify an Intel ME firmware image with the final purpose of reducing its ability to interact with the system.

Intel ME

Intel ME is a co-processor integrated in all post-2006 Intel boards, which is the base hardware for many Intel features like Intel AMT, Intel Boot Guard, Intel PAVP and many others. To provide such features, it requires full access to the system, including memory (through DMA) and network access (transparent to the user).

Unlike many other firmware components, the Intel ME firmware can't be neither disabled nor reimplemented, as it is tightly integrated in the boot process and it is signed.

This poses an issue both to the free firmware implementations like coreboot, which are forced to rely on a proprietary, obscure and always-on blob, and to the privacy-aware users, who are reasonably worried about such firmware, running on the lowest privilege ring on x86.

What can be done

Before Nehalem (ME version 6, 2008/2009) the ME firmware could be removed completely from the flash chip by setting a couple of bits inside the flash descriptor, effectively disabling it.

Starting from Nehalem the Intel ME firmware can't be removed anymore: without a valid firmware the PC shuts off forcefully after 30 minutes, probably as an attempt to enforce the Intel Anti-Theft policies.

However, while Intel ME can't be turned off completely, it is still possible to modify its firmware up to a point where Intel ME is active only during the boot process, effectively disabling it during the normal operation, which is what me_cleaner tries to accomplish.

Platform support

me_cleaner currently works on most of the Intel platforms; while this doesn't mean it works on all the boards (due to the different firmware implementations), it has been proven quite reliable on a great number of them.

Usage

me_cleaner should handle all the steps necessary to the modification of an Intel ME firmware with the command:

  $ python me_cleaner.py -S -O modified_image.bin original_dump.bin

However, obtaining the original firmware and flashing back the modified one is usually not trivial, as the Intel ME firmware region is often non-writable from the OS (and it's not a safe option anyways), requiring the use of an external SPI programmer.

Results

For generation 1 (before Nehalem, ME version <= 5) this tool removes the whole ME firmware and disables it completely.

For generation 2 (Nehalem-Broadwell, ME version between 6 and 10) this tool removes almost everything, leaving only the two fundamental modules needed for the correct boot, ROMP and BUP. The firmware size is reduced from 1.5 MB (non-AMT firmware) or 5 MB (AMT firmware) to ~90 kB.

For generation 3 (from Skylake onwards, ME version >= 11) the ME subsystem and the firmware structure have changed, requiring substantial changes in me_cleaner. The fundamental modules required for the correct boot are now four (rbe, kernel, syslib and bup) and the minimum firmware size is ~300 kB (from the 2 MB of the non-AMT firmware and the 7 MB of the AMT one).

On some boards the OEM firmware fails to boot without a valid Intel ME firmware; in the other cases the system should work with minor inconveniences (like longer boot times or warning messages) or without issues at all.

Obviously, the features provided by Intel ME won't be functional anymore after the modifications.

Documentation

The detailed documentation about the working of me_cleaner can be found on the page "How does it work?" page.

Various guides and tutorials are available on the Internet, however a good starting point is the "How to apply me_cleaner" guide.

Comments
  • Add an option to truncate the ME file

    Add an option to truncate the ME file

    I've just tested it and logged my findings here https://nroach44.id.au/index.php/2017/01/24/thinkpad-x220-shrink-the-me-region/ Basically if we truncate the ME region to the last byte, update the ifd, everything works as expected.

    Would it be possible to have an option to automatically truncate the file if we are cleaning the just the ME region, and if we are doing the whole firmware ROM spit out a ifdtool layout with the smaller ME region?

    opened by nroach44 59
  • [HP] Determine what features break OEM RSA signatures and make them optional or adjust to fix

    [HP] Determine what features break OEM RSA signatures and make them optional or adjust to fix

    My HP Spectre x360's bios uses AMI Aptio V, however it also uses a proprietary RSA based .sig file along with the factory .bin bios file.

    In the past I had success flashing with me_cleaner (see the issue about the project status), but the current version breaks signature validation resulting in an error message instead of a flash.

    Going back, I do find that revision fbc123e28ac852f280fb66be8c872ccb28fe6a24 and earlier versions work, even on the current F.46 bios version (ME 11.0) but the newer ones do something that causes the invalidation of the signature.

    At the very least we know that the ME should be crippled/disabled with the older version, but some of the newer enhancements are surely safe, except for any that may change file size or otherwise invalidate the key somehow.

    opened by ilikenwf 43
  • Issue with me_2.0.5.3105 on Braswell SoC

    Issue with me_2.0.5.3105 on Braswell SoC

    http://pastebin.com/Py8r1bFc

    http://pastebin.com/GkQjrZBu

    https://www.dropbox.com/s/dxs1p7kv1en7mo1/me_2.0.5.3105.rar?dl=0

    Also size of the .rgn is 8GB after the script stops.

    opened by hermitcrabslab 33
  • [Tutorial] Flash Asus Z170 Pro Gaming using Ubuntu

    [Tutorial] Flash Asus Z170 Pro Gaming using Ubuntu

    Warning. Follow this at your own risk. You could brick your computer. Read the me_cleaner Wiki pages first.

    I'm new to all this and it took quite a while to gather all this information. So to save anyone else the trouble here's what I learned.

    You'll need access to a second computer to flash the BIOS chip of your main computer. (Or you could buy a second BIOS chip - they are cheap - flash it and then swap them.)

    You can flash the BIOS chip from a 64 bit computer using a 32 bit computer (well it worked for the Z170 Pro Gaming anyway.)

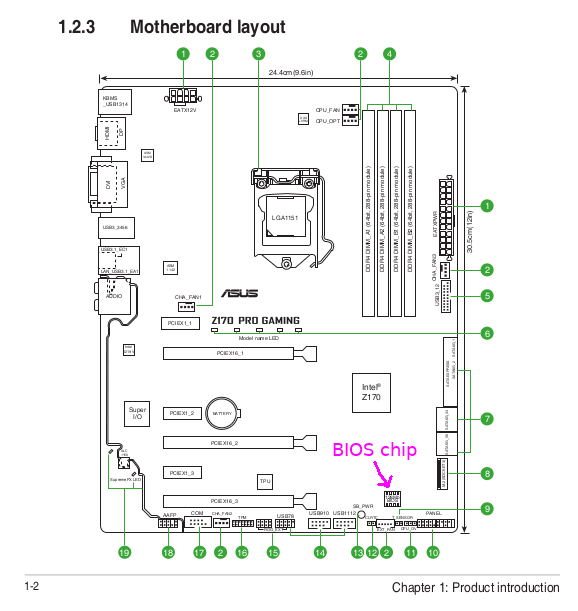
    The Asus Z170 Pro Gaming is a great motherboard for flashing the BIOS as the chip is easily removed. It just plugs in and out of a socket. That makes flashing easier. The location of the chip is shown on page 1-2 of the Asus User Guide. Its located below the Z170 chip. bios chip location
    Its best to flash the BIOS chip 'externally' as some regions of the chip might be locked or inaccessible if you try flashing 'internally'. (I tried the internal method using various versions of FreeDOS and various DOS flashing tools and ALL were a waste of time.)

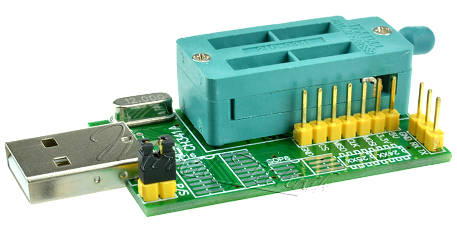
    The tool to flash the chip externally (the USB 'Programmer') is very inexpensive. Mine was ~$5. Search ebay for "CH341A USB bios board programmer 24 25 series"

    UPDATE It's probably best to get a green one like this: green_one The black ones have a voltage issue. I used a black one and it worked fine - but its better to be safe. See mooms06's comment below.
    Make note of any changes you have made to your BIOS setup as they will be lost after flashing.

    You can run a couple of commands before and after the flash that will confirm Intel ME is disabled. Before:

    $ ls /dev | grep mei
    mei0
    	
    $ lspci | grep -i communi
    00:16.0 Communication controller: Intel Corporation Sunrise Point-H CSME HECI #1
    
    $ cat /proc/bus/pci/devices | grep a13a
    (It returned a couple lines of numbers and spaces and 'mei' was at the end.)
    

    They all confirm that Intel ME is on my system.

    (1) Extract the BIOS .ROM from the Ausus .CAP with UEFITool

    UPDATE As mooms06 points out you can avoid having to use UEFITool by using the BIOS rom you extract from the chip in step (4) below then go back to step (2) to disable Intel ME on the extracted rom. In fact, it's a better method as it will also preserve your LAN MAC address, S/N and UUIDs. If you use a 'vanilla' Asus BIOS you'll have to use another app to restore them manually. OR For security/privacy you may prefer not to have any S/N or UUID on your motherboard. I only found out about this after I flashed mine and my MAC, S/N and UUID were cleared. But the system (Ubuntu 17.10) works fine without them! The system (or BIOS?) generated a generic MAC address (you should be able to change it via software in the OS anyway.)

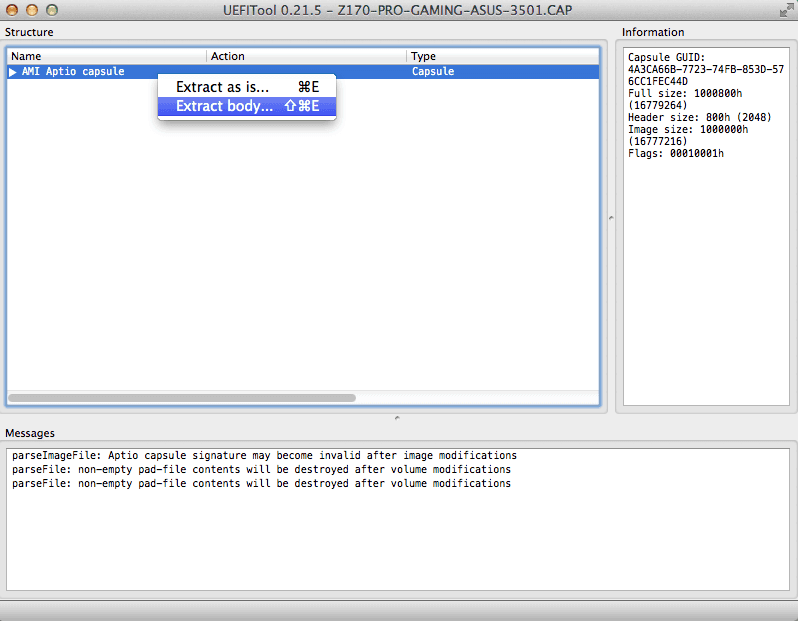
    This example explains that you need UEFITool to extract the BIOS rom from the .CAP file that Asus uses. me-cleaner can't work with .CAP files. There are Windows and OS X apps ready to use but on Linux you have to compile your own version. I don't know how to do that but I had access to a mac so I used the OS X version. I used ver 0.21.5 as in the example.

    And I used it on Asus' current BIOS ver 3501.

    Open the Asus .CAP file with UEFITool and highlight the top line "AMI Aptio Capsule". Right click on it and select "Extract body". Save it with .rom extension. uefitool
    (2) Disable Intel ME

    This may be obvious to some but it took me a while to find it. There is a built in help in the me_cleaner script: $ python me_cleaner.py --help

    User mooms06 says the -S option (--soft-disable) is best for the Pro Gaming as it prevents a 15 sec delay on startup ~~that -s (--soft-disable-only) causes.~~ To disabled Intel ME I used: $ python me_cleaner.py -O modified.rom -S Z170-PRO-GAMING-ASUS-3501.rom

    (3) Remove the BIOS chip

    Power off your system fully and unplug it from the mains. Its a good precaution to discharge and staic from your body by touching something metal. Locate the BIOS chip and remove it. Take note of the direction the indent on the chip's top is facing, thats important. Be VERY CAREFUL removing it. I jerked removing mine and bent the pins! bent pins
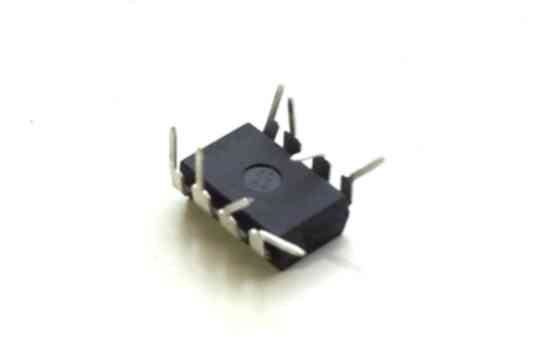
    Thankfully none were broken and I was able to straighten them. I have a sore arm so it was more difficult for me. With a bit of care it shouldn't be an issue.

    Plug the chip into the USB programmer tool. Again, take note to the chip orientation. It should be like this (note the notch on the chip top): orientation

    usb programmer

    (4) Check the USB programmer is working

    On the second computer install flashrom if its not already installed. Plug in the USB programmer tool.

    I loosely followed this guide's flashrom process.

    First I read (extracted) the chip's existing BIOS.

    $ sudo flashrom -p ch341a_spi -r extracted1.rom
    
    flashrom v0.9.9-r1954 on Linux 4.9.0-4-686-pae (i686)
    flashrom is free software, get the source code at https://flashrom.org
    
    Calibrating delay loop... OK.
    Found Winbond flash chip "W25Q128.V" (16384 kB, SPI) on ch341a_spi.
    Reading flash... done.
    

    That took 3 mins 20sec.

    Read a second copy of the current BIOS

    $ sudo flashrom -p ch341a_spi -r extracted2.rom
    
    flashrom v0.9.9-r1954 on Linux 4.9.0-4-686-pae (i686)
    flashrom is free software, get the source code at https://flashrom.org
    
    Calibrating delay loop... OK.
    Found Winbond flash chip "W25Q128.V" (16384 kB, SPI) on ch341a_spi.
    Reading flash... done.
    

    Now compare the two extracted BIOSes with 'diff'

    $ diff extracted1.rom extracted2.rom

    There should be no result if both are the same. If there is a difference stop and read this and follow his recommendations.

    I don't have 'ifdtool' tool to confirm the extracted .roms are BIOSes (and not just junk data). Instead I took a look at extracted1.rom in UEFITool and I could see it seemed ok. That confirms the UBS Programmer and BIOS chip setup is working.

    (5) Flash the BIOS

    Here we go:

    $ sudo flashrom -p ch341a_spi -w 'modified.rom'
    	
    flashrom v0.9.9-r1954 on Linux 4.9.0-4-686-pae (i686)
    flashrom is free software, get the source code at https://flashrom.org
    
    Calibrating delay loop... OK.
    Found Winbond flash chip "W25Q128.V" (16384 kB, SPI) on ch341a_spi.
    Reading old flash chip contents... done.
    Erasing and writing flash chip... Erase/write done.
    Verifying flash... VERIFIED.
    

    That took about 7mins. (UPDATE: It takes about 13mins using a green USB programmer.)

    Unplug the USB programmer, remove the BIOS chip and return it carefully to your motherboard.

    (6) Reboot your system

    The moment of truth. Start up your PC and go into the BIOS setup by pressing DEL at boot.

    You can confirm Intel ME is gone by going into 'Advanced Mode' and under the 'Main' tab the 'ME Firmware Version' should read 0.0.0.0. Before it would have read something like 11.6.11.1092 intel me gone
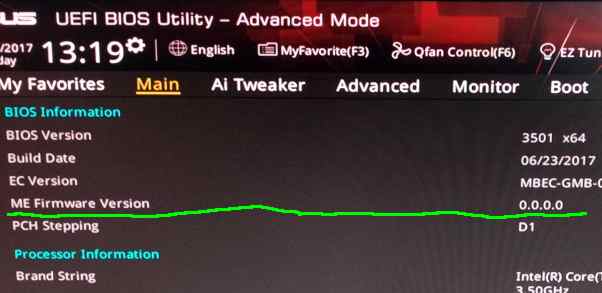
    Don't forget to re-apply any modifications you had previously made to your BIOS.

    Exit the BIOS and continue into Ubuntu.

    You can run the same commands you ran before the flash for comparison: $ ls /dev | grep mei [nothing]

    $ lspci | grep -i communi [nothing]

    $ cat /proc/bus/pci/devices | grep a13a [nothing]

    The fact they returned nothing shows Intel ME has been disabled. I'd run 'intelmetool' but you need to compile it yourself and I'm not able to do that. But the checks we've run are pretty clear that Intel ME is gone.

    Finally confirm the computer stays on for more than 30 mins and your are done. Your computer is Intel ME free.

    Thanks to corna and contributors for me_cleaner and thanks to mooms06 for his help. His answers might help you further.

    And don't forget to donate to corna if you can.

    opened by older-pack 32
  • Support for ME 11.x

    Support for ME 11.x

    I saw you mentioned at the readme that the ME 11.x FTPR structure is not yet know. Actually it has been since November 2015 or so. Of course it's not 100% understood yet like ME 2-10 but it's getting close. I created a wiki page with the structure of ME 11.x FTPR partition which is what me_cleaner targets.

    Also, the Huffman modules can be separated into compressed parts based on their "header". What's interesting is that I haven't seen so far anything which may restrict us from moving FTPR directly this time like we did in the past with the LUT.

    Edit: Removed my wiki page as it is very outdated compared to the recent presentation by Dmitry Sklyarov when it comes to FTPR extensions. I'll write some "ctype" structures at the next version of MEA instead for anyone interested.

    Edit 2: Added all $CPD extensions at MEA v1.12.0

    opened by platomav 28
  • Lenovo x270: power-up delays, freeze on suspend

    Lenovo x270: power-up delays, freeze on suspend

    Hi everyone

    Inspired by your talk on the 34C3, I managed to flash my Lenovo x270 by creating a dump of the BIOS chip, successfully cleaned it with me_cleaner and then flashed that image. The good news: it seems to basically work, the device powers on and runs (no errors, no shutdown after 30 mins or something like that). Unfortunately, I can't verify that ME is disabled since /dev/mem/, which is required by intelmetool, does not exist on my Arch Linux (even when setting the iomen kernel parameter in grub). But that's no big deal for now. The bad news: I experience a delay of about 20 seconds on power up until the boot screen appears (when powering on the device or restarting it) where the device is turned on, but does not seem to do anything. While I could live with that, the even worse part is that it freezes when I wake up the device from suspend. When I wake it up (push the power button), the device turns on (power LED, display, keyboard lights etc), but then immediately freezes and does not respond to any input (keyboard, acpi, etc). The only option is a forced power off. Since this can have many different causes, it's hard to debug. But having nothing changed except the ME-free BIOS it kind of points toward this as cause. So I want to ask if this behaviour is already known and a work-around exists (or maybe I did something wrong?).

    Thanks already for the support. Please let me know if I can provide additional information. I can also provide model specific information (type and location of the BIOS ROM for the x270 etc) and pictures if needed.

    opened by je-nix 26
  • Coreboot/SeaBIOS/me_cleaner on Thinkpad X1 Carbon 1st gen

    Coreboot/SeaBIOS/me_cleaner on Thinkpad X1 Carbon 1st gen

    Hi, I tried to install Coreboot with SeaBIOS and neutralized Intel ME on a Thinkpad X1 Carbon 1st gen and get the following issue: the keyboard briefly lights up and the fan starts spinning, but the laptop doesn't boot. I then restored the lower 8 MB of the original BIOS (which, if I'm correct, contains the Intel ME) and got the same result. I finally had to restore also the upper 4 MB of the original firmware image to be able to boot the machine up again. Maybe the problem is that I have Intel Boot Guard enabled or I did something wrong when compiling Coreboot. How can I find out if I have the Boot Guard activated? I tried intelmetool -s but didn't find any message about that?!

    opened by elpinguinoatgmxch 26
  • Question: does me_cleaner still work after the recent ME patch from Intel?

    Question: does me_cleaner still work after the recent ME patch from Intel?

    As you probably know, Intel has recently admitted to some serious security vulnerabilities in the ME, and released a patch: https://security-center.intel.com/advisory.aspx?intelid=INTEL-SA-00086&languageid=en-fr

    The obvious question is whether or not this patch will prevent me_cleaner from working, whether intentionally or not.

    I'm told (but have no way to confirm) that the patch is included in recent Windows 10 updates, so anyone using that OS will be hard-pressed to avoid it.

    opened by ndorf 24
  • MSI X99S MPower Blank Screen then Boot Loops

    MSI X99S MPower Blank Screen then Boot Loops

    I tried this on my msi x99s mpower motherboard described here: https://ca.msi.com/Motherboard/X99S-MPOWER.html#hero-overview. Specifically I tried the newest M.B revision of bios. After flashing, my computer rebooted to a black screen. It looks like the video card did not initialize at all. I waited for 5 minutes but nothing happened. After, I force restarted the computer and it went into a boot loop. Tries to turn on, turns off turns on again. Luckily the motherboard has 2 bios chips so I used the secondary bios to flash the primary one with an unmodified M.B revision and everything is ok now. Thank you for your hard work in this project. I suppose I might be willing to try it again since recovering a bricked bios is pretty easy for this motherboard.

    Here's the output when I run the script:

    [[email protected] me_clean]$ python3 me_cleaner.py E7885IMS.MB0 Full image detected The ME region goes from 0x1000 to 0x7fffff Found FPT header at 0x1010 Found 20 partition(s) ME firmware version 9.1.10.1000 Found FTPR header: FTPR partition spans from 0x48000 to 0xd0000 Removing extra partitions... Removing extra partition entries in FPT... Removing EFFS presence flag... Correcting checksum (0xea)... Reading FTPR modules list... Wiping LZMA section (0xadbb4 - 0xd0000) UPDATE (LZMA, 0x0adbb4 - 0x0addde): removed ROMP (Huffman, 0x04eac0 - 0x04eec9): NOT removed, essential BUP (Huffman, 0x04eec9 - 0x05fd1f): NOT removed, essential KERNEL (Huffman, 0x05fd1f - 0x095093): removed POLICY (Huffman, 0x095093 - 0x0adbb4): removed ClsPriv (LZMA, 0x0addde - 0x0ae1b7): removed SESSMGR (LZMA, 0x0ae1b7 - 0x0b9b51): removed SESSMGR_PRIV (LZMA, 0x0b9b51 - 0x0bf430): removed HOSTCOMM (LZMA, 0x0bf430 - 0x0c773a): removed TDT (LZMA, 0x0c773a - 0x0ccaef): removed FPF (LZMA, 0x0ccaef - 0x0ce5f2): removed Done! Good luck!

    opened by AAccount 23
  • Removing huffman modules

    Removing huffman modules

    Hi, I have written a patch that removes all huffman modules in the LLUT table by setting the flag for all huffman chunks to 0, meaning that the chunks get interpreted as already uncompressed data. Then I wiped the actual data. This might work if the hash of each binary huffman module is not verified against its corresponding hash in the module header. It seems the LZMA module hashes are not verified so perhaps the huffman ones are not verified too. Anyway, this is worth a shot...

    Please test https://github.com/zamaudio/me_cleaner/tree/experiments_remove_huffman

    opened by zamaudio 18
  • [SOLVED]

    [SOLVED] "Unknown descriptor version: 7" when passing stock HP BIOS image

    Dear all,

    I have a HP EliteBook Revolve 810 G2 laptop. I have attempted to disable Intel ME as described under (). However, I'm getting errors: First, running ifdtool on the stock HP BIOS image results in:

    [email protected]:~/me_cleaner$ sudo ../coreboot/util/ifdtool/ifdtool -d ~/L86_0140.bin File /home/waseem/L86_0140.bin is 8388608 bytes Unknown descriptor version: 7

    And intelmetool -b prints:

    [email protected]:~/coreboot/util/intelmetool$ sudo ./intelmetool
    Bad news, you have a `8 Series LPC Controller` so you have ME hardware on board and you can't control or disable it, continuing...
    
    MEI found: [8086:9c3a] 8 Series HECI #0
    
    ME Status   : 0x1e000245
    ME Status 2 : 0x60002306
    
    ME: FW Partition Table      : OK
    ME: Bringup Loader Failure  : NO
    ME: Firmware Init Complete  : YES
    ME: Manufacturing Mode      : NO
    ME: Boot Options Present    : NO
    ME: Update In Progress      : NO
    ME: Current Working State   : Normal
    ME: Current Operation State : M0 with UMA
    ME: Current Operation Mode  : Normal
    ME: Error Code              : No Error
    ME: Progress Phase          : Host Communication
    ME: Power Management Event  : Clean Moff->Mx wake
    ME: Progress Phase State    : Host communication established
    
    ME: Extend SHA-256: a5f317b15d978d0d0066770953f9f03188e061d74292b92a137a4199d2df4139
    
    ME: Firmware Version 9.5.1730.15 (code) 9.5.1730.15 (recovery) 9.5.1730.15 (fitc)
    
    ME Capability: Full Network manageability                 : ON
    ME Capability: Regular Network manageability              : OFF
    ME Capability: Manageability                              : ON
    ME Capability: Small business technology                  : OFF
    ME Capability: Level III manageability                    : OFF
    ME Capability: IntelR Anti-Theft (AT)                     : OFF
    ME Capability: IntelR Capability Licensing Service (CLS)  : ON
    ME Capability: IntelR Power Sharing Technology (MPC)      : OFF
    ME Capability: ICC Over Clocking                          : ON
    ME Capability: Protected Audio Video Path (PAVP)          : ON
    ME Capability: IPV6                                       : ON
    ME Capability: KVM Remote Control (KVM)                   : ON
    ME Capability: Outbreak Containment Heuristic (OCH)       : OFF
    ME Capability: Virtual LAN (VLAN)                         : ON
    ME Capability: TLS                                        : ON
    ME Capability: Wireless LAN (WLAN)                        : ON
    Bad news, you have a `8 Series LPC Controller` so you have ME hardware on board and you can't control or disable it, continuing...
    
    ME Capability: BootGuard                                  : OFF
    
    Your system isn't bootguard ready. You can flash other firmware!
    

    Running me_cleaner.py on the stock BIOS image results in very concise and very unhelpful output:

    Unknown image
    

    However, running this same command on the ME Firmware image obtained from HP Support and Drivers for my laptop results in some output. Edit: Some output, unlike what happened with this guy: https://github.com/corna/me_cleaner/issues/152 (see first comment)

    I'm stranded on this ... Any help is greatly appreciated!

    opened by WaseemAlkurdi 17
  • Not working well on Gigabyte GA-H55M-S2H through internal flashing, help

    Not working well on Gigabyte GA-H55M-S2H through internal flashing, help

    Hi, I have motherboard Gigabyte GA-H55M-S2H, H55 chipset (Ibex Peak), with processor family Nehalem (Lynnfield). I've downloaded BIOS from Gigabyte's website here: https://download.gigabyte.com/FileList/BIOS/mb_bios_ga-h55m-s2h_f7.exe?v=81bbbe13998d689201ddae260eea27c6 , it's a full SPI ROM with also ME in it (it's 8MB). The ME/TXE firmware version is 6.0.30.1203. To extract and to flash images I used mainly "flashspi.exe" (present in the download from Gigabyte), because it never makes me problems before in extracting and flashing. Specifically I used the command flashspi.exe with /C /D /E to flash and with /S to extract.

    I tried to clean ME (and flash) in a stock SPI image (from site) and in an extracted one. I used (in addition to Gigabyte tool FLASHSPI.exe (freeDOS)) also Qflash (a tool in the BIOS) later. I use internal flashing because the motherboard has Dual BIOS and because the flashing seems to write the entire chip.

    Following me_cleaner guide I've checked all images with ifdtool -d (and also with unhuffme) commands and all image files have (in ifdtool output) the same FLREGn Section, not as expected (the BIOS Region):

    PCH Revision: 5 series Ibex Peak
    FLMAP0:    0x02040002
      NR:      2
      FRBA:    0x40
      NC:      1
      FCBA:    0x20
    FLMAP1:    0x10100206
      ISL:     0x10
      FPSBA:   0x100
      NM:      2
      FMBA:    0x60
    FLMAP2:    0x00000020
      PSL:     0x0000
      FMSBA:   0x200
    FLUMAP1:   0x00000eec
      Intel ME VSCC Table Length (VTL):        14
      Intel ME VSCC Table Base Address (VTBA): 0x000ec0
    
    ME VSCC table:
      JID0:  0x0000471f
        SPI Component Vendor ID:            0x1f
        SPI Component Device ID 0:          0x47
        SPI Component Device ID 1:          0x00
      VSCC0: 0x20152015
        Lower Erase Opcode:                 0x20
        Lower Write Enable on Write Status: 0x06
        Lower Write Status Required:        No
        Lower Write Granularity:            64 bytes
        Lower Block / Sector Erase Size:    4KB
        Upper Erase Opcode:                 0x20
        Upper Write Enable on Write Status: 0x06
        Upper Write Status Required:        No
        Upper Write Granularity:            64 bytes
        Upper Block / Sector Erase Size:    4KB
      JID1:  0x004a25bf
        SPI Component Vendor ID:            0xbf
        SPI Component Device ID 0:          0x25
        SPI Component Device ID 1:          0x4a
      VSCC1: 0x20092009
        Lower Erase Opcode:                 0x20
        Lower Write Enable on Write Status: 0x50
        Lower Write Status Required:        Yes
        Lower Write Granularity:            1 bytes
        Lower Block / Sector Erase Size:    4KB
        Upper Erase Opcode:                 0x20
        Upper Write Enable on Write Status: 0x50
        Upper Write Status Required:        Yes
        Upper Write Granularity:            1 bytes
        Upper Block / Sector Erase Size:    4KB
      JID2:  0x001620c2
        SPI Component Vendor ID:            0xc2
        SPI Component Device ID 0:          0x20
        SPI Component Device ID 1:          0x16
      VSCC2: 0x20052005
        Lower Erase Opcode:                 0x20
        Lower Write Enable on Write Status: 0x50
        Lower Write Status Required:        No
        Lower Write Granularity:            64 bytes
        Lower Block / Sector Erase Size:    4KB
        Upper Erase Opcode:                 0x20
        Upper Write Enable on Write Status: 0x50
        Upper Write Status Required:        No
        Upper Write Granularity:            64 bytes
        Upper Block / Sector Erase Size:    4KB
      JID3:  0x001630ef
        SPI Component Vendor ID:            0xef
        SPI Component Device ID 0:          0x30
        SPI Component Device ID 1:          0x16
      VSCC3: 0x20052005
        Lower Erase Opcode:                 0x20
        Lower Write Enable on Write Status: 0x50
        Lower Write Status Required:        No
        Lower Write Granularity:            64 bytes
        Lower Block / Sector Erase Size:    4KB
        Upper Erase Opcode:                 0x20
        Upper Write Enable on Write Status: 0x50
        Upper Write Status Required:        No
        Upper Write Granularity:            64 bytes
        Upper Block / Sector Erase Size:    4KB
      JID4:  0x001720c2
        SPI Component Vendor ID:            0xc2
        SPI Component Device ID 0:          0x20
        SPI Component Device ID 1:          0x17
      VSCC4: 0x20052005
        Lower Erase Opcode:                 0x20
        Lower Write Enable on Write Status: 0x50
        Lower Write Status Required:        No
        Lower Write Granularity:            64 bytes
        Lower Block / Sector Erase Size:    4KB
        Upper Erase Opcode:                 0x20
        Upper Write Enable on Write Status: 0x50
        Upper Write Status Required:        No
        Upper Write Granularity:            64 bytes
        Upper Block / Sector Erase Size:    4KB
      JID5:  0x001740ef
        SPI Component Vendor ID:            0xef
        SPI Component Device ID 0:          0x40
        SPI Component Device ID 1:          0x17
      VSCC5: 0x20052005
        Lower Erase Opcode:                 0x20
        Lower Write Enable on Write Status: 0x50
        Lower Write Status Required:        No
        Lower Write Granularity:            64 bytes
        Lower Block / Sector Erase Size:    4KB
        Upper Erase Opcode:                 0x20
        Upper Write Enable on Write Status: 0x50
        Upper Write Status Required:        No
        Upper Write Granularity:            64 bytes
        Upper Block / Sector Erase Size:    4KB
      JID6:  0x004b25bf
        SPI Component Vendor ID:            0xbf
        SPI Component Device ID 0:          0x25
        SPI Component Device ID 1:          0x4b
      VSCC6: 0x20092009
        Lower Erase Opcode:                 0x20
        Lower Write Enable on Write Status: 0x50
        Lower Write Status Required:        Yes
        Lower Write Granularity:            1 bytes
        Lower Block / Sector Erase Size:    4KB
        Upper Erase Opcode:                 0x20
        Upper Write Enable on Write Status: 0x50
        Upper Write Status Required:        Yes
        Upper Write Granularity:            1 bytes
        Upper Block / Sector Erase Size:    4KB
    
    OEM Section:
    00: 21 27 2d 6c 68 35 2d b5 35 01 00 00 00 02 00 00
    10: 00 00 50 20 01 08 74 65 73 74 2e 42 49 4e 13 64
    20: 20 00 00 2d 80 86 e1 f7 46 93 7d a6 7f bb bb a7
    30: 48 40 0e 8a a2 b5 ae 08 d4 62 b5 b4 c3 22 c5 ab
    
    Found Region Section
    FLREG0:    0x00000000
      Flash Region 0 (Flash Descriptor): 00000000 - 00000fff 
    FLREG1:    0x07ff0000
      Flash Region 1 (BIOS): 00000000 - 007fffff 
    FLREG2:    0x04f20001
      Flash Region 2 (Intel ME): 00001000 - 004f2fff 
    FLREG3:    0x00000fff
      Flash Region 3 (GbE): 00fff000 - 00000fff (unused)
    FLREG4:    0x00000fff
      Flash Region 4 (Platform Data): 00fff000 - 00000fff (unused)
    
    Found Component Section
    FLCOMP     0x0930001c
      Dual Output Fast Read Support:       not supported
      Read ID/Read Status Clock Frequency: 33MHz
      Write/Erase Clock Frequency:         33MHz
      Fast Read Clock Frequency:           33MHz
      Fast Read Support:                   supported
      Read Clock Frequency:                20MHz
      Component 2 Density:                 4MB
      Component 1 Density:                 8MB
    FLILL      0x00000000
      Invalid Instruction 3: 0x00
      Invalid Instruction 2: 0x00
      Invalid Instruction 1: 0x00
      Invalid Instruction 0: 0x00
    FLPB       0x00000000
      Flash Partition Boundary Address: 0x000000
    
    Found PCH Strap Section
    PCHSTRP0  : 0x00205782
    PCHSTRP1  : 0x0000000f
    PCHSTRP2  : 0x00000000
    PCHSTRP3  : 0x00000000
    PCHSTRP4  : 0x00c8e002
    PCHSTRP5  : 0x00000000
    PCHSTRP6  : 0x00000000
    PCHSTRP7  : 0x00000000
    PCHSTRP8  : 0x00000000
    PCHSTRP9  : 0x00000503
    PCHSTRP10 : 0x00010044
    PCHSTRP11 : 0x99000097
    PCHSTRP12 : 0x00000000
    PCHSTRP13 : 0x00000000
    PCHSTRP14 : 0x00000000
    PCHSTRP15 : 0x00000318
    AltMeDisable bit is not set
    
    Found Master Section
    FLMSTR1:   0xffff0000 (Host CPU/BIOS)
      Platform Data Region Write Access: enabled
      GbE Region Write Access:           enabled
      Intel ME Region Write Access:      enabled
      Host CPU/BIOS Region Write Access: enabled
      Flash Descriptor Write Access:     enabled
      Platform Data Region Read Access:  enabled
      GbE Region Read Access:            enabled
      Intel ME Region Read Access:       enabled
      Host CPU/BIOS Region Read Access:  enabled
      Flash Descriptor Read Access:      enabled
      Requester ID:                      0x0000
    
    FLMSTR2:   0xffff0000 (Intel ME)
      Platform Data Region Write Access: enabled
      GbE Region Write Access:           enabled
      Intel ME Region Write Access:      enabled
      Host CPU/BIOS Region Write Access: enabled
      Flash Descriptor Write Access:     enabled
      Platform Data Region Read Access:  enabled
      GbE Region Read Access:            enabled
      Intel ME Region Read Access:       enabled
      Host CPU/BIOS Region Read Access:  enabled
      Flash Descriptor Read Access:      enabled
      Requester ID:                      0x0000
    
    FLMSTR3:   0xffff0118 (GbE)
      Platform Data Region Write Access: enabled
      GbE Region Write Access:           enabled
      Intel ME Region Write Access:      enabled
      Host CPU/BIOS Region Write Access: enabled
      Flash Descriptor Write Access:     enabled
      Platform Data Region Read Access:  enabled
      GbE Region Read Access:            enabled
      Intel ME Region Read Access:       enabled
      Host CPU/BIOS Region Read Access:  enabled
      Flash Descriptor Read Access:      enabled
      Requester ID:                      0x0118
    
    Found Processor Strap Section
    ????:      0xffffffff
    ????:      0xffffffff
    ????:      0xffffffff
    ????:      0xffffffff
    ????:      0xffffffff
    ????:      0xffffffff
    ????:      0xffffffff
    ????:      0xffffffff
    

    Specifically here the BIOS Region seems to start in a wrong place (its end seems good); while seems that ME starts in right address and end in a 0xff zone (but this area includes ME anyway so it's not bad, I suppose).

    At first I ignored this and cleaned both images (the stock one and the extracted with flashspi.exe one) with me_cleaner.py -S -O (same output)

    Full image detected
    The ME/TXE region goes from 0x1000 to 0x4f3000
    Found FPT header at 0x1010
    Found 14 partition(s)
    Found FTPR header: FTPR partition spans from 0xf2000 to 0x1b2000
    ME/TXE firmware version 6.0.30.1203
    Public key match: Intel ME, firmware versions 6.x.x.x
    The AltMeDisable bit is NOT SET
    Reading partitions list...
     FOVD (0x00000400 - 0x000002000, 0x00001c00 total bytes): removed
     EFFS (0x00002000 - 0x0000e2000, 0x000e0000 total bytes): removed
     NVKR (NVRAM partition, no data, 0x00010000 total bytes): nothing to remove
     BIEL (      no data here      , 0x00003000 total bytes): nothing to remove
     BIIS (      no data here      , 0x00036000 total bytes): nothing to remove
     NVTD (NVRAM partition, no data, 0x00002000 total bytes): nothing to remove
     NVCM (NVRAM partition, no data, 0x00004000 total bytes): nothing to remove
     NVOS (NVRAM partition, no data, 0x00011000 total bytes): nothing to remove
     NVSH (NVRAM partition, no data, 0x00007000 total bytes): nothing to remove
     BIAL (      no data here      , 0x00009000 total bytes): nothing to remove
     NVVE (NVRAM partition, no data, 0x00000c00 total bytes): nothing to remove
     GLUT (0x000e2000 - 0x0000f2000, 0x00010000 total bytes): removed
     FTPR (0x000f2000 - 0x0001b2000, 0x000c0000 total bytes): NOT removed
     NFTP (0x001b2000 - 0x0004f2000, 0x00340000 total bytes): removed
    Removing partition entries in FPT...
    Removing EFFS presence flag...
    Correcting checksum (0xe7)...
    Reading FTPR modules list...
     BUP              (Huffman, fragmented data, ~30 KiB  ): NOT removed, essential
     VE_FW_NAND       (Huffman, fragmented data, ~152 KiB ): removed
     KERNEL           (Huffman, fragmented data, ~100 KiB ): removed
     POLICY           (Huffman, fragmented data, ~90 KiB  ): removed
     VENOM            (LZMA   , 0x1507f3 - 0x152648       ): removed
     HOSTCOMM         (LZMA   , 0x152648 - 0x1570dd       ): removed
     RSA              (LZMA   , 0x1570dd - 0x15d05d       ): removed
     CLS              (LZMA   , 0x15d05d - 0x160a6e       ): removed
     TDT              (LZMA   , 0x160a6e - 0x163c4a       ): removed
    The ME minimum size should be 1056768 bytes (0x102000 bytes)
    The ME region can be reduced up to:
     00001000:00102fff me
    Setting the AltMeDisable bit in PCHSTRP10 to disable Intel ME...
    Checking the FTPR RSA signature... VALID
    Done! Good luck!
    

    and flashed them (through flashspi.exe). But the result for both was a BIOS blocked in initial phase of POST, that displays the first screen just with the name of CPU (with a different frequency) in detected devices area; and I can't do anything neither enter to settings. So I restored main with backup BIOS, through a method found in another issue for Gigabyte mb.

    Then, as the Wiki says that the regions section has to be reasonable, I suppose that the problem is the not regular FLREGn section. The Wiki also says that this happens because the BIOS is not in a "plain" format. So I searched in Google and in Gigabyte site if there are some conversion tools or instructions to convert BIOS in plain format but I found nothing at all, I neither found any informations about standard "plain" format for BIOS/SPI (Maybe it is the real bytes in the chip or a not proprietary format?).

    Trying to resolve the issue by myself, I searched how to modify FLREG manually and it takes me a long time; after that I finally found how to do it and I fixed the BIOS region (in FD) making it to start from 0x700000 instead of 0x000000 (I suppose is right viewing the hex). And I cleaned the resulting image through me_cleaner -S (apparently with success). Here the output of ifdtool -d with the image (this time after the cleaning) with FLREGn modified as I wanted:

    PCH Revision: 5 series Ibex Peak
    FLMAP0:    0x02040002
      NR:      2
      FRBA:    0x40
      NC:      1
      FCBA:    0x20
    FLMAP1:    0x10100206
      ISL:     0x10
      FPSBA:   0x100
      NM:      2
      FMBA:    0x60
    FLMAP2:    0x00000020
      PSL:     0x0000
      FMSBA:   0x200
    FLUMAP1:   0x00000eec
      Intel ME VSCC Table Length (VTL):        14
      Intel ME VSCC Table Base Address (VTBA): 0x000ec0
    
    ME VSCC table:
      JID0:  0x0000471f
        SPI Component Vendor ID:            0x1f
        SPI Component Device ID 0:          0x47
        SPI Component Device ID 1:          0x00
      VSCC0: 0x20152015
        Lower Erase Opcode:                 0x20
        Lower Write Enable on Write Status: 0x06
        Lower Write Status Required:        No
        Lower Write Granularity:            64 bytes
        Lower Block / Sector Erase Size:    4KB
        Upper Erase Opcode:                 0x20
        Upper Write Enable on Write Status: 0x06
        Upper Write Status Required:        No
        Upper Write Granularity:            64 bytes
        Upper Block / Sector Erase Size:    4KB
      JID1:  0x004a25bf
        SPI Component Vendor ID:            0xbf
        SPI Component Device ID 0:          0x25
        SPI Component Device ID 1:          0x4a
      VSCC1: 0x20092009
        Lower Erase Opcode:                 0x20
        Lower Write Enable on Write Status: 0x50
        Lower Write Status Required:        Yes
        Lower Write Granularity:            1 bytes
        Lower Block / Sector Erase Size:    4KB
        Upper Erase Opcode:                 0x20
        Upper Write Enable on Write Status: 0x50
        Upper Write Status Required:        Yes
        Upper Write Granularity:            1 bytes
        Upper Block / Sector Erase Size:    4KB
      JID2:  0x001620c2
        SPI Component Vendor ID:            0xc2
        SPI Component Device ID 0:          0x20
        SPI Component Device ID 1:          0x16
      VSCC2: 0x20052005
        Lower Erase Opcode:                 0x20
        Lower Write Enable on Write Status: 0x50
        Lower Write Status Required:        No
        Lower Write Granularity:            64 bytes
        Lower Block / Sector Erase Size:    4KB
        Upper Erase Opcode:                 0x20
        Upper Write Enable on Write Status: 0x50
        Upper Write Status Required:        No
        Upper Write Granularity:            64 bytes
        Upper Block / Sector Erase Size:    4KB
      JID3:  0x001630ef
        SPI Component Vendor ID:            0xef
        SPI Component Device ID 0:          0x30
        SPI Component Device ID 1:          0x16
      VSCC3: 0x20052005
        Lower Erase Opcode:                 0x20
        Lower Write Enable on Write Status: 0x50
        Lower Write Status Required:        No
        Lower Write Granularity:            64 bytes
        Lower Block / Sector Erase Size:    4KB
        Upper Erase Opcode:                 0x20
        Upper Write Enable on Write Status: 0x50
        Upper Write Status Required:        No
        Upper Write Granularity:            64 bytes
        Upper Block / Sector Erase Size:    4KB
      JID4:  0x001720c2
        SPI Component Vendor ID:            0xc2
        SPI Component Device ID 0:          0x20
        SPI Component Device ID 1:          0x17
      VSCC4: 0x20052005
        Lower Erase Opcode:                 0x20
        Lower Write Enable on Write Status: 0x50
        Lower Write Status Required:        No
        Lower Write Granularity:            64 bytes
        Lower Block / Sector Erase Size:    4KB
        Upper Erase Opcode:                 0x20
        Upper Write Enable on Write Status: 0x50
        Upper Write Status Required:        No
        Upper Write Granularity:            64 bytes
        Upper Block / Sector Erase Size:    4KB
      JID5:  0x001740ef
        SPI Component Vendor ID:            0xef
        SPI Component Device ID 0:          0x40
        SPI Component Device ID 1:          0x17
      VSCC5: 0x20052005
        Lower Erase Opcode:                 0x20
        Lower Write Enable on Write Status: 0x50
        Lower Write Status Required:        No
        Lower Write Granularity:            64 bytes
        Lower Block / Sector Erase Size:    4KB
        Upper Erase Opcode:                 0x20
        Upper Write Enable on Write Status: 0x50
        Upper Write Status Required:        No
        Upper Write Granularity:            64 bytes
        Upper Block / Sector Erase Size:    4KB
      JID6:  0x004b25bf
        SPI Component Vendor ID:            0xbf
        SPI Component Device ID 0:          0x25
        SPI Component Device ID 1:          0x4b
      VSCC6: 0x20092009
        Lower Erase Opcode:                 0x20
        Lower Write Enable on Write Status: 0x50
        Lower Write Status Required:        Yes
        Lower Write Granularity:            1 bytes
        Lower Block / Sector Erase Size:    4KB
        Upper Erase Opcode:                 0x20
        Upper Write Enable on Write Status: 0x50
        Upper Write Status Required:        Yes
        Upper Write Granularity:            1 bytes
        Upper Block / Sector Erase Size:    4KB
    
    OEM Section:
    00: 21 27 2d 6c 68 35 2d b5 35 01 00 00 00 02 00 00
    10: 00 00 50 20 01 08 74 65 73 74 2e 42 49 4e 13 64
    20: 20 00 00 2d 80 86 e1 f7 46 93 7d a6 7f bb bb a7
    30: 48 40 0e 8a a2 b5 ae 08 d4 62 b5 b4 c3 22 c5 ab
    
    Found Region Section
    FLREG0:    0x00000000
      Flash Region 0 (Flash Descriptor): 00000000 - 00000fff 
    FLREG1:    0x07ff0700
      Flash Region 1 (BIOS): 00700000 - 007fffff 
    FLREG2:    0x04f20001
      Flash Region 2 (Intel ME): 00001000 - 004f2fff 
    FLREG3:    0x00000fff
      Flash Region 3 (GbE): 00fff000 - 00000fff (unused)
    FLREG4:    0x00000fff
      Flash Region 4 (Platform Data): 00fff000 - 00000fff (unused)
    
    Found Component Section
    FLCOMP     0x0930001c
      Dual Output Fast Read Support:       not supported
      Read ID/Read Status Clock Frequency: 33MHz
      Write/Erase Clock Frequency:         33MHz
      Fast Read Clock Frequency:           33MHz
      Fast Read Support:                   supported
      Read Clock Frequency:                20MHz
      Component 2 Density:                 4MB
      Component 1 Density:                 8MB
    FLILL      0x00000000
      Invalid Instruction 3: 0x00
      Invalid Instruction 2: 0x00
      Invalid Instruction 1: 0x00
      Invalid Instruction 0: 0x00
    FLPB       0x00000000
      Flash Partition Boundary Address: 0x000000
    
    Found PCH Strap Section
    PCHSTRP0  : 0x00205782
    PCHSTRP1  : 0x0000000f
    PCHSTRP2  : 0x00000000
    PCHSTRP3  : 0x00000000
    PCHSTRP4  : 0x00c8e002
    PCHSTRP5  : 0x00000000
    PCHSTRP6  : 0x00000000
    PCHSTRP7  : 0x00000000
    PCHSTRP8  : 0x00000000
    PCHSTRP9  : 0x00000503
    PCHSTRP10 : 0x000100c4
    PCHSTRP11 : 0x99000097
    PCHSTRP12 : 0x00000000
    PCHSTRP13 : 0x00000000
    PCHSTRP14 : 0x00000000
    PCHSTRP15 : 0x00000318
    AltMeDisable bit is set
    
    Found Master Section
    FLMSTR1:   0xffff0000 (Host CPU/BIOS)
      Platform Data Region Write Access: enabled
      GbE Region Write Access:           enabled
      Intel ME Region Write Access:      enabled
      Host CPU/BIOS Region Write Access: enabled
      Flash Descriptor Write Access:     enabled
      Platform Data Region Read Access:  enabled
      GbE Region Read Access:            enabled
      Intel ME Region Read Access:       enabled
      Host CPU/BIOS Region Read Access:  enabled
      Flash Descriptor Read Access:      enabled
      Requester ID:                      0x0000
    
    FLMSTR2:   0xffff0000 (Intel ME)
      Platform Data Region Write Access: enabled
      GbE Region Write Access:           enabled
      Intel ME Region Write Access:      enabled
      Host CPU/BIOS Region Write Access: enabled
      Flash Descriptor Write Access:     enabled
      Platform Data Region Read Access:  enabled
      GbE Region Read Access:            enabled
      Intel ME Region Read Access:       enabled
      Host CPU/BIOS Region Read Access:  enabled
      Flash Descriptor Read Access:      enabled
      Requester ID:                      0x0000
    
    FLMSTR3:   0xffff0118 (GbE)
      Platform Data Region Write Access: enabled
      GbE Region Write Access:           enabled
      Intel ME Region Write Access:      enabled
      Host CPU/BIOS Region Write Access: enabled
      Flash Descriptor Write Access:     enabled
      Platform Data Region Read Access:  enabled
      GbE Region Read Access:            enabled
      Intel ME Region Read Access:       enabled
      Host CPU/BIOS Region Read Access:  enabled
      Flash Descriptor Read Access:      enabled
      Requester ID:                      0x0118
    
    Found Processor Strap Section
    ????:      0xffffffff
    ????:      0xffffffff
    ????:      0xffffffff
    ????:      0xffffffff
    ????:      0xffffffff
    ????:      0xffffffff
    ????:      0xffffffff
    ????:      0xffffffff
    

    It seemed good to me for FLREG and FLMSTR sections, so I flashed it, but nothing worked again in the same way as before. I tried also this "correction" with an image extracted through BIOS Qflash, obtaining the same results. I tried also to change the region address back to the original situation (after cleaning), but didn't work the same. So my editing is not enough.

    Then I tried to just disable the bit (in an image with wrong FLREG) as a temporary workaround, with -s option, and to flash again but neither this worked.

    I imagine that now the (unique) thing to do is to convert BIOS into plain format (or to obtain it). But I don't know how to do it (excuse me I'm new to this things). I've read that sometimes it could be obtained through an external programmer that copies the effective BIOS. If so I could try it but before I want to know if it is an effective solution, then if the image will be more compatible with me_cleaner. So I ask here if for example the programmer procedure could change something, or if someone knows where I can find some informations about this plain format of BIOS/SPI/firmware and a way to convert mine in that if possible, or something else that could resolve my problem.

    Thank you. And congratulation for the tool that you provide to us.

    Updates:

    I forgot to try without setting the bit... Attempts:

    • I tryed to clean image without options and something changed. In fact, at first boot I see the BIOS loading, but slower and then writing at screen "Fix ME firmware data" with a percentual progression from 0 to 100 and rebooting, similarly to this post I found. After that I have an apparently working BIOS, but with an adding delay before POST, a menu BIOS normal (less a M.I.T. screen less informative) but very slow with saving BIOS setup and rebooting and a power on and reset button not working while PC is turned on (long press shuts down and reboots), thing that forces me to enter in an O.S. and shutdown from there (don't turn off with the switch even after POST because it stayed off for a while). The good thing is that the OS seemed to work well (for example I can get the temperatures) for now. After a while just the reset button returned to work.

    • I try to set the address BIOS in FLREG's FD right as before and reflash. Now the message "Fix ME firmware ecc..." doesn't appear. It seems is going better... It's not as expected yet, since the BIOS' booting and menu is slow (but a bit less than before). In other words I have to wait seconds after I confirm "Save & Exit", before POST, and after I press the reset button to reboot effectively (when there aren't disks to boot). Now I don't think that problem is not to flash with extern. programmer or even the non-plain BIOS maybe. Is a not good BIOS implementation, it seems.

    Update 2 I found confirmation that, in this case, the absence of BIOS' start address is an issue common in motherboards of a certain period (not a sympthom of a not-plain BIOS) as mentioned here. So it's good to fix it.

    This SPI seems tricky to clean, but I hope that I'll get more improvements soon and that someone has some advices. Thanks.

    opened by c-fst 1
  • TPM is also deactivated ASUS G20CI

    TPM is also deactivated ASUS G20CI

    I tried the patch with my G20Ci

    its working and intel ME is no longer active, but TPM is also deactivated, as i use windows 11 TPM is a requirement.

    image

    is TPM part of the intel ME?

    cheers

    opened by creisey 0
  • HP ProBook 450 G8: Unknown image

    HP ProBook 450 G8: Unknown image

    Hi, i used a raspi to read what i assumed is the flash chip on a HP ProBook 450 G8. The chip is a Winbond W25Q256, image is 33554432 bytes and passes the diff test. To my disappointment me_cleaner returns 'Unknown image', and ifdtool says 'No Flash Descriptor in this image'.

    The wiki says to post failed attempts here so here i am. What would be your next step if you were prepared to spend some time on this? I guess it might be the wrong chip but could be a lot of other reasons too, i'm very interested i your input to try to figure this out!

    opened by nastybyte 0
  • Add soft-disable support for Intel ME 12, 14, 15 and 16

    Add soft-disable support for Intel ME 12, 14, 15 and 16

    I haven't tested with others Intel ME for the 15 version, but I guess that should work, as the PCI device (Intel ME) is not present anymore and seems to act like it's disabled, but I'll need to do more tests with AMT to be sure.

    If someone is looking at this pull request and is willing to test the soft-disable, since Intel ME 15 might have different HAP bit offsets between chipsets etc, although I'm not really sure about that, I don't have any other computers to test with.

    Thanks to @dt-zero and @6d6178667269747a for previous versions of Intel ME.

    If that doesn't work, try this guess: https://github.com/corna/me_cleaner/pull/384#issuecomment-1220260578

    opened by XutaxKamay 19
  • Easy way to disable Intel ME on Samsung laptops

    Easy way to disable Intel ME on Samsung laptops

    This method doesn't require any firmware modification or hardware access, disables the management engine on subsequent reboots until a shut down. So there's no risk of bricking the hardware and it's easy to revert. One drawback is, while disabled the ME region will be unlocked for read/write access which could pose a risk in case an advanced malware or adversary gains access to your system.

    There is a hidden BIOS menu on (some?) Samsung laptops that gives access to advanced settings. It appears on the Exit section of the BIOS screen after pressing these keys at the same time: Ctrl + Alt + Shift + F4

    There, under ME settings is an option to turn off sending the "End of POST" message to the management engine. Switching this off allows you to send certain commands to the ME interface from your OS to temporarily disable it.

    This document explains the commands that disable ME under various conditions:

    https://github.com/ptresearch/me-disablement/blob/master/How%20to%20become%20the%20sole%20owner%20of%20your%20PC.pdf

    I first tried the third method (Soft temporary disable) but it didn't do anything. Then I tried the second one: HMR FPO - Host ME Region Flash Protection Override. On next reboot the management engine was turned off. It is supposed to work for just one reboot but it still stays off on further reboots, so either the document is inaccurate or the disabled "End of POST" message is helping keep the ME turned off.

    To send the commands, I use the me_util.py tool from here: https://github.com/skochinsky/me-tools

    The script works with 32-bit Python 2.7 on Windows, it can probably be turned into an .exe file for easier use.

    I use this command for the second method (HMRFPO) from the document. It will only work if you already disabled the "End of POST" message from the hidden BIOS settings.

    python me_util.py 0x05 0x01 0000000000000000

    Using this command and rebooting (not shutting down) the laptop will disable ME. After any shut down, just use the command again and reboot to disable the ME again.

    While disabled, it stays stuck in this state until shut down: meinfo

    opened by disableme1 1
  • Intel AdlerLake

    Intel AdlerLake

    Hi,

    I've attempted to run the me_cleaner.py on 12th Intel Core i7-12700 on MSI PRO Z690 and the UEFITool shows the version of the ME Region is 16.0.151545.

    Is there a guide on how to read the region and remove the ME?

    Would it be helpful to link the dump of the ROM?

    opened by phodina 2
Releases(v1.2)
  • v1.2(Mar 31, 2018)

    Changes from v1.1:

    • Fix the ME permission removal on gen. 3
    • Add public key match
    • Print the compressed size of the Huffman modules on gen. 2
    • Wipe the ME6 Ignition firmware images
    • Fix the removal of the last partition on ME6
    • Various region size fixes
    • Add manpage
    • Add setup.py
    • Print the value of the HAP/AltMeDisable bit
    Source code(tar.gz)
    Source code(zip)
    me_cleaner-1.2.tar.gz.asc(833 bytes)
Owner
Nicola Corna
Nicola Corna
Deep Illuminator is a data augmentation tool designed for image relighting.

Deep Illuminator Deep Illuminator is a data augmentation tool designed for image relighting. It can be used to easily and efficiently genera

George Chogovadze 52 Nov 29, 2022
Rembg is a tool to remove images background.

Rembg is a tool to remove images background.

Daniel Gatis 7.8k Jan 05, 2023
A SIXEL encoder/decoder implementation derived from kmiya's sixel

libsixel What is this? This package provides encoder/decoder implementation for DEC SIXEL graphics, and some converter programs. (https://youtu.be/0Sa

Hayaki Saito 2k Jan 09, 2023
Png2Jpg tool will help you convert from png image format to jpg images format.

PNG 2 JPG All codes assume running from root directory. Please update the sys path at the beginning of the codes before running. Over View Png2Jpg too

Nguyễn Trường Lâu 2 Dec 27, 2021
Bringing vtk.js into Dash and Python

Dash VTK Dash VTK lets you integrate the vtk.js visualization pipeline directly into your Dash app. It is powered by react-vtk-js. Docs Demo Explorer

Plotly 88 Nov 29, 2022
QR fixer part is standalone but for image to FQR conversion

f-qr-fixer QR fixer part is standalone but for image to FQR conversion it requires Pillow (can be installed with easy_install), qrtools (on ubuntu the

2 Nov 22, 2022
The ctypes-based simple ImageMagick binding for Python

Wand Wand is a ctypes-based simple ImageMagick binding for Python, supporting 2.7, 3.3+, and PyPy. All functionalities of MagickWand API are implement

Eric McConville 1.2k Dec 30, 2022
Kainat 13 Mar 07, 2022
Napari simpleitk image processing

napari-simpleitk-image-processing (n-SimpleITK) Process images using SimpleITK in napari Usage Filters of this napari plugin can be found in the Tools

Robert Haase 11 Dec 19, 2022
Program to export all new icons from the latest Fortnite patch

Assets Exporter This program allows you to generate all new icons of a patch in png! Requierements Python =3.8 (installed on your computer) If you wa

ᴅᴊʟᴏʀ3xᴢᴏ 6 Jun 24, 2022
Python avatar generator for absolute nerds

pagan Welcome to the Python Avatar Generator for Absolute Nerds. Current version: 0.4.3 View the change history here. Remember those good old days whe

David Bothe 280 Dec 16, 2022
Conversion of Image, video, text into ASCII format

asciju Python package that converts image to ascii Free software: MIT license

Aju Tamang 11 Aug 22, 2022
Repair broken bookmarks to referenced files in Apple Photos

Repair Apple Photos Bookmarks Work in progress to repair file location bookmarks in Apple Photos. Background Starting in macOS 10.15/Catalina, photos

Rhet Turnbull 10 Nov 03, 2022
hashmask reverse lookup

ImageHashMasks Lookup Hashmask NFT index from a picture Setup pip install pillow click imagehash Usage $ python imagehashmasks.py

17 Nov 29, 2021
LGVL helper script to batch and convert with lvgl offline image converter

script to batch and convert with lvgl offline image converter

Yohann 1 Oct 05, 2022
Fast batch image resizer and rotator for JPEG and PNG images.

imgp is a command line image resizer and rotator for JPEG and PNG images.

Terminator X 921 Dec 25, 2022
A simple python script to reveal the contents of a proof of vaccination QR code.

vaxidecoder A simple python script to reveal the contents of a proof of vaccination QR code. It takes a QR code image as input, and returns JSon data.

Hafidh 2 Feb 28, 2022
Optimize/Compress images using python

Image Optimization Using Python steps to run the script run the command to install the required libraries pip install -r requirements.txt create a dir

Shekhar Gupta 1 Oct 15, 2021
kikuchipy is an open-source Python library for processing and analysis of electron backscatter diffraction (EBSD) patterns

kikuchipy is an open-source Python library for processing and analysis of electron backscatter diffraction (EBSD) patterns. The library builds on the

pyxem 53 Dec 29, 2022