当前位置:网站首页>ZXing简化版,转载
ZXing简化版,转载
2022-07-26 09:19:00 【LHBTM】
前言
最近公司的Android项目需要用到摄像头做条码或二维码的扫描,Google一下,发现一个以Apache License 2.0 开源的 ZXing项目。Zxing项目里的Android实现太过复杂多余东西太多,得对其进行简化。
前提条件
下载源代码:点击这里
编译核心库:Zxing的主页上有介绍具体步骤,大家也可以参照这篇博文:android 条码识别软件开发全解析(续2详解绝杀!)
导入项目
打开Eclipse 导入 源码中的 Android 项目,然后右击项目 选择“Build path”——》"Add External Archives" 把核心库 core.jar文件加入到项目中。
此时编译一下项目,会发现报错,“ Multiple substitutions specified in non-positional format; did you mean to add the formatted="false" attribute?”之类的。打开raw 下的Values 发现错误是在一个<String>上。这里把 “preferences_custom_product_search_summary” 里的 %s %f 全部都改成 %1$s %1$f(因为我们用不到多国语言,建议只保留默认的Value ,其他全部删除)。
原因:由于新的SDK采用了新版本的aapt(Android项目编译器),这个版本的aapt编译起来会比老版本更加的严格,然后在Android最新的开发文档的描述String的部分,已经说明如何去设置 %s 等符号
“If you need to format your strings using String.format(String, Object...) , then you can do so by putting your format arguments in the string resource. For example, with the following resource:
<string name="welcome_messages">Hello, %1$s! You have %2$d new messages.</string>
In this example, the format string has two arguments: %1$s is a string and %2$d is a decimal number. You can format the string with arguements from your application...“
经过以上步骤后项目应该就可以运行了。
但是ZXing的android项目东西太多了,有很多是我们不需要的,得新建另一个项目简化它。
简化
在开始前大致介绍一下简化ZXing需要用到各个包 、类的职责。
- CaptureActivity。这个是启动Activity 也就是扫描器(如果是第一安装,它还会跳转到帮助界面)。
- CaptureActivityHandler 解码处理类,负责调用另外的线程进行解码。
- DecodeThread 解码的线程。
- com.google.zxing.client.android.camera 包,摄像头控制包。
- ViewfinderView 自定义的View,就是我们看见的拍摄时中间的框框了。
新建另一个项目
新建另一个项目将启动的Activity命名为CaptureActivity,并导入核心库。项目新建完成后我们打开 CaptureActivity 的布局文件,我这里为main。把里面的XML修改为:

2 android:layout_width="fill_parent" android:layout_height="fill_parent">
3 <SurfaceView android:id="@+id/preview_view"
4 android:layout_width="fill_parent" android:layout_height="fill_parent"
5 android:layout_centerInParent="true"/>
6
7 <com.Zxing.Demo.view.ViewfinderView
8 android:id="@+id/viewfinder_view" android:layout_width="fill_parent"
9 android:layout_height="fill_parent" android:background="@android:color/transparent"/>
10 <TextView android:layout_width="wrap_content"
11 android:id="@+id/txtResult"
12 android:layout_height="wrap_content" android:text="@string/hello"/>
13
14 </FrameLayout>
可以看到在XML里面用到了 ViewfinderView 自定义view 。所以新建一个View 的包,然后把:ViewfinderView 和 ViewfinderResultPointCallback 靠到里面(记得对应修改XML里面的包)。
打开 CaptureActivity 覆盖 onCreate 方法:
2 publicvoid onCreate(Bundle savedInstanceState) {
3 super.onCreate(savedInstanceState);
4 setContentView(R.layout.main);
5 //初始化 CameraManager
6 CameraManager.init(getApplication());
7
8 viewfinderView = (ViewfinderView) findViewById(R.id.viewfinder_view);
9 txtResult = (TextView) findViewById(R.id.txtResult);
10 hasSurface =false;
11 inactivityTimer =new InactivityTimer(this);
12 }
这里调用到的 CameraManager 类是控制摄像头的包里的类。新建一个camera包把:com.google.zxing.client.android.camera 里面的类全部拷入,另外我把PlanarYUVLuminanceSource也拷入到这个包里面。根据错误的提示来修正代码,主要是修改正包结构。(整个简化的流程都是如此:“根据错误提示,修改代码”)。

在修改的过程中,有很多是关于R 资源的问题,在此我们需要将Values 里面的两个xml资源文件拷入项目中:colos.xml 和ids.xml 。 ctrl+b 一下看看error 是不是少了很多。在CameraManager中有些地方需要用到项目的配置,这里需要把配置直接写入代码中:
//是否使用前灯
// if (prefs.getBoolean(PreferencesActivity.KEY_FRONT_LIGHT, false)) {
// FlashlightManager.enableFlashlight();
// }
FlashlightManager.enableFlashlight();
使用摄像头需要加入相应的权限:
<uses-permission android:name="android.permission.WRITE_EXTERNAL_STORAGE"></uses-permission>
<uses-feature android:name="android.hardware.camera"/>
<uses-feature android:name="android.hardware.camera.autofocus"/>
<uses-permission android:name="android.permission.VIBRATE"/>
<uses-permission android:name="android.permission.FLASHLIGHT"/>
当View 和 camera 包里的错误修正完成后,我们继续来看CaptureActivity。
覆盖onResume方法初始化摄像头:
protectedvoid onResume() {
super.onResume();
SurfaceView surfaceView = (SurfaceView) findViewById(R.id.preview_view);
SurfaceHolder surfaceHolder = surfaceView.getHolder();
if (hasSurface) {
initCamera(surfaceHolder);
} else {
surfaceHolder.addCallback(this);
surfaceHolder.setType(SurfaceHolder.SURFACE_TYPE_PUSH_BUFFERS);
}
decodeFormats =null;
characterSet =null;
playBeep =true;
AudioManager audioService = (AudioManager) getSystemService(AUDIO_SERVICE);
if (audioService.getRingerMode() != AudioManager.RINGER_MODE_NORMAL) {
playBeep =false;
}
initBeepSound();
vibrate =true;
}
 initCameraSurfaceHolder接口实现
initCamera () 方法用于初始化摄像头,如果排除了所有的error ,运行项目时就可以看到大致扫描界面了。 surfaceHolder.addCallback(this);表示让CaptureActivity实现其callback接口。
handler = new CaptureActivityHandler(this, decodeFormats,characterSet) 用于进行扫描解码处理。
解码
上面的步骤主要都是用于对摄像头的控制,而解码的真正工作入口是在CaptureActivityHandler 里面的。新建一个Decoding包把以下文件拷入包中:
- CaptureActivityHandler
- DecodeFormatManager
- DecodeHandler
- DecodeThread
- FinishListener
- InactivityTimer
- Intents
由于我们的包结构和Zxing 项目的有所不同所以需要注意一下类的可访问性
同样开始ctrl+B 编译一下,然后开始修正错误。
在CaptureActivityHandler 里 把 handleMessage 里的部分方法先注释掉如:“decode_succeeded ”分支,这是解码成功时调用 CaptureActivity 展示解码的结果。
在DecodeThread 类里,修改部分涉及Preference配置的代码:
Vector<BarcodeFormat> decodeFormats,
String characterSet,
ResultPointCallback resultPointCallback) {
this.activity = activity;
handlerInitLatch =new CountDownLatch(1);
hints =new Hashtable<DecodeHintType, Object>(3);
//// The prefs can't change while the thread is running, so pick them up once here.
// if (decodeFormats == null || decodeFormats.isEmpty()) {
// SharedPreferences prefs = PreferenceManager.getDefaultSharedPreferences(activity);
// decodeFormats = new Vector<BarcodeFormat>();
// if (prefs.getBoolean(PreferencesActivity.KEY_DECODE_1D, true)) {
// decodeFormats.addAll(DecodeFormatManager.ONE_D_FORMATS);
// }
// if (prefs.getBoolean(PreferencesActivity.KEY_DECODE_QR, true)) {
// decodeFormats.addAll(DecodeFormatManager.QR_CODE_FORMATS);
// }
// if (prefs.getBoolean(PreferencesActivity.KEY_DECODE_DATA_MATRIX, true)) {
// decodeFormats.addAll(DecodeFormatManager.DATA_MATRIX_FORMATS);
// }
// }
if (decodeFormats ==null|| decodeFormats.isEmpty()) {
decodeFormats =new Vector<BarcodeFormat>();
decodeFormats.addAll(DecodeFormatManager.ONE_D_FORMATS);
decodeFormats.addAll(DecodeFormatManager.QR_CODE_FORMATS);
decodeFormats.addAll(DecodeFormatManager.DATA_MATRIX_FORMATS);
}
hints.put(DecodeHintType.POSSIBLE_FORMATS, decodeFormats);
if (characterSet !=null) {
hints.put(DecodeHintType.CHARACTER_SET, characterSet);
}
hints.put(DecodeHintType.NEED_RESULT_POINT_CALLBACK, resultPointCallback);
}
这里是设置 解码的类型,我们现在默认将所有类型都加入。
错误类型基本上都是:包结构、PreferencesActivity 的配置 、类可访问性的问题。根据错误提示耐心把错误解决。
返回解码结果
还记得在 CaptureActivityHandler 的 messagehandler 里注销掉的Case分支吗?现在CaptureActivity 里实现它。
inactivityTimer.onActivity();
viewfinderView.drawResultBitmap(barcode);
playBeepSoundAndVibrate();
txtResult.setText(obj.getBarcodeFormat().toString() +":"
+ obj.getText());
}
最后
ZXing的简化已基本完成,有几位是可以运行成功的?呵呵。
下面是CaptureActivity的源码:
CaputreActivity简化过的包结构图:

简化后的ZXing 更加方便我们了解ZXing项目 是如何解码的。只要仔细查看源码,进行单点跟踪调试,相信大家很容易能理解。
边栏推荐
猜你喜欢

【Mysql】认识Mysql重要架构(一)

Li Mu D2L (VI) -- model selection

redis原理和使用-基本特性

Windows通过命令备份数据库到本地

NTT (fast number theory transformation) polynomial inverse 1500 word analysis

Server memory failure prediction can actually do this!
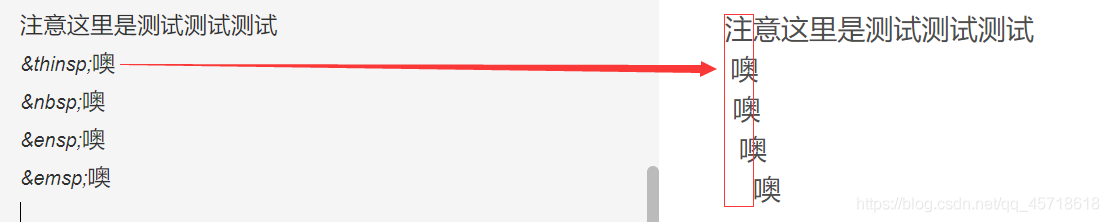
csdn空格用什么表示

C# Serialport的发送和接收

STM32+MFRC522完成IC卡号读取、密码修改、数据读写

Ext4 file system opens dir_ After nlink feature, link_ Use link after count exceeds 65000_ Count=1 means the quantity is unknown
随机推荐
[MySQL] how to execute an SQL statement (2)
The essence of attack and defense strategy behind the noun of network security
2022 tea artist (intermediate) special operation certificate examination question bank simulated examination platform operation
"No input file specified" problem handling
codeforces dp合集
Apple generated and verified tokens for PHP
Processing of inconsistent week values obtained by PHP and MySQL
Windows通过命令备份数据库到本地
unity简易消息机制
【线上问题】Timeout waiting for connection from pool 问题排查
【final关键字的使用】
Polynomial open root
What is the difference between NFT and digital collections?
Elastic APM安装和使用
谷粒学院的全部学习源码
"Could not build the server_names_hash, you should increase server_names_hash_bucket_size: 32"
2022 chemical automation control instrument operation certificate test question simulation test platform operation
聪明的美食家 C语言
Thread Join 和Object wait 的区别
多项式开根