当前位置:网站首页>Introduction to blender automated modeling
Introduction to blender automated modeling
2022-07-19 10:15:00 【Brain in new VAT】
In this tutorial , We'll learn something about Blender Script technology —— For example, how to use code processing 、 operation 、 Copy and animate mesh primitives . Combine all these technologies , We will create a wavy conical pattern —— A cool looking animation , You can turn it into a loop GIF.
I will use bpy.data A series of attributes and methods in the module to review the most important bpy library . I will also introduce how to learn from others Python File import code , And how to use other code editors to write Blender Code . Of course , Use Blender There are many other things about creative coding , But that's all I've covered in this short tutorial series .
Before proceeding , start-up Blender( Using the command line ). If it has been opened , Please use File > New > General Create a new Blender file . You can see a new scene , One of the cubes is located in xyz coordinate (0, 0, 0).
1、 Import bpy
bpy Library is the reason why all magic happens . It contains nine main modules , To enable you to use Python control Blender; They are bpy.app, bpy.context, bpy.data, bpy.msgbus, bpy.ops, bpy.path, bpy.props, bpy.types, and bpy.utils. stay Python Console ,bpy The library is automatically imported and immediately available . however , When you use a text editor ( Or any other code editor ) To write Python Script time , You must first add the necessary import That's ok , And then you can use it bpy.
Be careful : except bpy,Blender It also includes several independent modules , for example aud Used for audio , as well as mathutils Used to operate the matrix 、 Euler 、 Quaternions and vectors .
Switch to Scripting tab , And then in Text Editor Middle click New To create a new Python Script .

Switch to Scripting Tab and start a new script
Add the following code to a new script to import bpy And print the list of objects in the scene :
import bpy
print(bpy.data.objects)
Run script ( Use Alt-P or Button ), The terminal shall display :
<bpy_collection[3], BlendDataObjects>
recall ,bpy_collection[3] Part indicates that there are three objects —— The camera 、 Cubes and lights . If you add or delete anything in the scene ,[3] Will change to reflect the total number of objects .

List cameras 、 Outline view of cube and light
however bpy.data.objects There's more to it . for example , You can use it to deal with Outliner Specific items in the list .
2、 Select object
In the previous content , We use Python Console to affect in 3D Objects selected in the viewport . however , More time , We will hope to pass Python Script to handle objects , It doesn't depend on GUI Content selected in . have access to bpy By name 、 The position of the object in the object sequence or some other attribute to select the object . If you are using bpy.context, Must be in 3D Select the cube in the viewport ( So it's orange ) To use the Python The code operates on it . Use bpy.data.objects, Can handle objects , Regardless of Blender What are the activities in the interface .
Use Pythonlist() function Handle bpy.data.objects To print the list of objects in the scene :
print(list(bpy.data.objects))
When running scripts , It should display the following output in the terminal :
[bpy.data.objects['Camera'], bpy.data.objects['Cube'], bpy.data.objects['Light']]
You can use its key ( Project name ) Or index ( Sequence in sequence ) To address any object . Index values start at zero —— therefore Camera yes item 0, Cube yes item 1, wait . have access to bpy.data.objects[‘Cube’] or bpy.data.objects[1] To address cubes . Next , We will use different properties and methods to manipulate cubes .
3、 Properties and methods
If you are familiar with any object-oriented programming language , Then you should have touched properties and methods before ( up to now , You may have found some examples of this in the code ). I won't look back Blender Script API Each property and method in —— Too much too much ! contrary , I will use some examples to help you find the available content ; The rest can be used API file .
Attributes are like variables belonging to objects . The data type of an object determines its properties . for example , Cube ( A three-dimensional mesh consisting of vertices ) Including its size 、 Coordinates and other attributes . The data type of the cube is bpy_types.Object , You can run in the terminal or console type(bpy.data.objects[‘Cube’]) To confirm that .
location attribute ( A number of bpy_types.Object One of the attributes ) Contains the coordinates of the cube , You can use it to reposition objects :
bpy.data.objects['Cube'].location = (3, 0, 0)
This will position the cube in xyz coordinate (3, 0, 0). under these circumstances , Will only affect x coordinate , So you can use :
bpy.data.objects['Cube'].location[0] = 3
Please note that ,.location[0] yes (3, 0, 0) First of all (x) Index of values . perhaps , Try this .location.x attribute , This can be said to be the most intuitive readable version :
bpy.data.objects['Cube'].location.x = 3
Run script , The cube should be moved to a new position , Along the x The axis is three units away from the center of the scene :

This cube x The coordinates are now 3
Because we have enabled python tooltips, So if you hover the mouse pointer over “ Object properties ” On any field in the panel , There will be a tooltip indicating how to Python Handle the specific attribute for the specific object in . This panel is usually located at Blender The lower right area of the interface , Located in the layout and script workspace . Below in , The tooltip shows the cube x Coordinate Python Details :
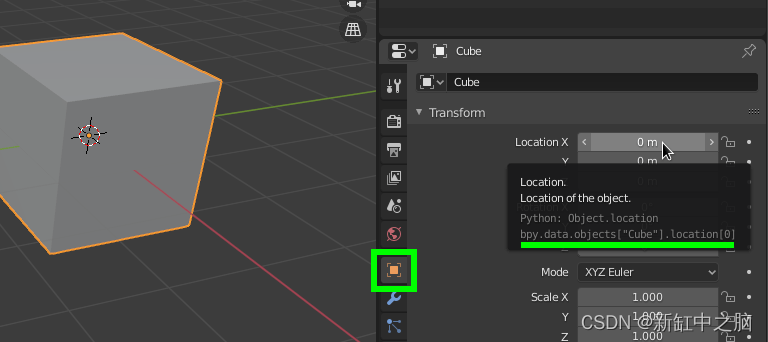
Cubic x The coordinates are stored in bpy.data.objects[“Cube”].location[0]
If you right-click this field , There will be one called Online Python Reference Menu options for , It will be Web Open the... In the browser location Property related documents :
location Entries in the online reference
Write down URL:https://docs.blender.org/api/2.83/bpy.types.Object.html#bpy.types.Object.location. Especially after the last slash . load /bpy.types.Object.html Webpage , And then there was #bpy.types.Object.location Jump / Scroll to location entry . You can also use the search function and link navigation reference in the left column . Sometimes use your web browser search function (Ctrl+F or Cmd+F) It will be convenient to quickly find content on a given page . If you want to try other properties , Might as well try. scale.
Now we have used some different properties , Let's see how .
Methods are like functions belonging to objects . They perform operations —— for example ,bpy.ops.mesh The module includes several methods for creating new meshes . It is easy to distinguish between attributes and methods , Because there is a pair of parentheses at the end of the method . In this section , We will use different methods to add and delete objects in the scene .
primitive_cone_add() Method will construct a conical mesh , let me put it another way , You can use this method to add a cone to the scene . Add this new line to the end of the script :
bpy.ops.mesh.primitive_cone_add()
When running code , This should add a new cone to the scene .

Use primitive_cone_add() Add a cone
primitive_cone_add() Method can also accept parameters to specify the cone radius 、 depth 、 Location 、 rotate 、 Proportion, etc . Add a second cone to the script , It contains a parameter that controls its position :
bpy.ops.mesh.primitive_cone_add(location=(-3, 0, 0))
When running scripts , A new cone will appear . however , If you check Outliner panel , You will notice that there are now three cones in the scene . The extra cone is a copy of the cone in the center of the stage ( Same size , Same position ). Every time you run a script , You will add more duplicates !

Outliner The panel shows three cones ( Although it seems that there are two )
To prevent this repetition , You can add a loop to check and delete any existing mesh in the scene . No more cubes or their code , So there is no need to replace it . The final script is as follows :
import bpy

# clear meshes in the scene
for obj in bpy.data.objects:
    if obj.type == 'MESH':
        bpy.data.objects.remove(obj)

# add two cones
bpy.ops.mesh.primitive_cone_add()
bpy.ops.mesh.primitive_cone_add(location=(-3, 0, 0))
remove() Method to remove objects from the scene . Now? , Every time you run a script , It will clear the existing mesh before adding it again .
Can be in API Find more in the documentation bpy.ops.mesh Method .
3、 Animation
stay Blender Animation programming in is very satisfactory . You can create a combination Python API、 Amazing dynamic images with powerful renderer and simulation functions . please remember , This is not “ Real time rendering ” Method . We will define the key frames in advance and render them completely to generate the sequence of frames that form the animation . This is not interactive , It's like you might be Processing Or created in some game engines . Here is a basic example , It can help you start using multi frame programming based on existing scripts .
Be careful :Blender Once included a game engine , This function is now out of use . However ,UPBGE( used Blender A branch of the game engine project ) and Armory Now aims at Blender Provide complete game development solutions in the environment .
Add the following code to the end of the script :
...
# animation variables
total_frames = 100
keyframe_interval = 10

# define a one hundred frame timeline
bpy.context.scene.frame_end = total_frames
bpy.context.scene.frame_start = 0

# add keyframes
for frame in range(0, total_frames + 1, keyframe_interval):
    bpy.context.scene.frame_set(frame)
    cone = bpy.data.objects['Cone']
    cone.location.x = frame / 25
    cone.keyframe_insert(data_path='location')
There are comment lines ( With # start ) To help explain each step . The cycle starts at 0 Frame to 100 frame ( total_frames) On the timeline every 10 frame (keyframe_interval ) Insert a new keyframe . The cone runs along x Axis forward 0.04 A unit of ;Blender Insert / Fill in this movement to make it smooth .
To help visualize what is happening , I am for Dope Sheet Switched Console panel ( stay 3D In the area below the viewport ) . You can see that each key frame is represented by a yellow dot . Press the spacebar to start and stop the animation ; The position of the blue playback header indicates the frame being played :
Conical animation Dope Sheet
Be careful : When using the spacebar to start animation , It will loop when it reaches the end . It's convenient to make it cycle when coding , So when you rerun the script , The animation will automatically refresh the preview .
You can decide the size of the key frame interval . By default , The movement between keyframes is linear —— therefore , actually , This animation only needs the 0 Frame and number 100 Key frame on frame . But I want to show you how to add more keys using a loop . If you want to adjust the animation curve , have access to Graph Editor Adjustment .
4、 Wave cone ( Or conical waves ?)
The following script combines all the techniques in this tutorial to generate a wavy pattern made of a cone . The following image shows the results of our efforts :
This is the code of animation :
import bpy
from math import sin, tau

# clear meshes in the scene
for obj in bpy.data.objects:
    if obj.type == 'MESH':
        bpy.data.objects.remove(obj)

# animation variables
total_frames = 150
theta = 0.0

# define a one hundred frame timeline
bpy.context.scene.frame_end = total_frames
bpy.context.scene.frame_start = 0

for x in range(30):
    # generate a grid of cones
    for y in range(30):
        cone = bpy.ops.mesh.primitive_cone_add()
        cone = bpy.context.object
        cone.name = 'Cone-{}-{}'.format(x, y)
        cone.location[0] = x * 2
        cone.location[1] = y * 2
        # add keyframes to each cone
        for frame in range(0, total_frames):
            bpy.context.scene.frame_set(frame)
            cone.location.z = sin(theta + x) * 2 - 1
            cone.keyframe_insert(data_path='location')
            scale = sin(theta + y)
            cone.scale = (scale, scale, scale)
            cone.keyframe_insert(data_path='scale')
            theta += tau / total_frames
under these circumstances , I didn't use keyframe spacing . just as Dope Sheet Shown ,150 Each frame in the frame has a separate key frame . I used one sin() Function to generate sine wave motion ; Must be from math Import this function into the Library , as well as tau( be equal to 2π). Running the script may take a while , It depends on the ability of the computer . Each can be reduced range() Function 30 Parameters to speed up .
Each frame has its own key frame
Now you can render the animation . I will not introduce how to perform this operation here , But you can refer to Blender Manual for guidance . I also added some lighting and material effects , Therefore, a black cone on a white background appears in the above figure . I use GIMP Frame (PNG) Compiled into a loop GIF Animation .
5、 More information about importing
About importing non Blender modular , We should know some problems , Especially when you split the script into multiple Python Document or use in the project 3 Square bag ( Libraries and modules ) when .
You have to use importlib.reload() Reload any you import Python Code . for example , This one is called bar.py The file of , There is one greeting Variable :
#bar.py
greeting = 'Hello, World!'
Suppose I would bar Import to a file named foo.py In the main script of , So that I can use greeting value . This is a foo.py Code :
#foo.py
import bpy, os, sys, importlib
dir = os.path.dirname(bpy.data.filepath)
sys.path.append(dir)

import bar
importlib.reload(bar)
print(bar.greeting)
my .blend) file 、foo.py and bar.py All saved in the same folder ;dir The variable points to this location .dir The path is attached to sys.path So that I can import any python file . If I change bar.py in greeting Value , This line prints the updated value —— Just because I include print()importlib.reload(bar) This business .
have access to pip( In fact Python Package installer ) To manage third-party packages , But you should use Blender Attached version . This is to install cowsay Demo of package .
First , Open the terminal and enter Blender The installation directory , And then into it 2.83 Catalog ( Or any applicable version number ). Now enter the following commands in sequence :
python/bin/python3.7m python/lib/python3.7/ensurepip
python/bin/pip3 install cowsay --target python/lib/python3.7/
stay Windows On , Need to enter :
python\bin\python.exe python\lib\ensurepip
python\bin\python.exe -m pip install cowsay --target python\lib
have access to python/bin/pip3 list(Windows: python\bin\python.exe -m pip list ) List installed packages . The terminal shall display the following :
Package    Version
---------- -------
cowsay     2.0.3
pip        19.0.3
setuptools 40.8.0
If you want to know cowsay What does it do , You can use the following code to run a new Blender Script :
import cowsay
cowsay.cow('Blender is rad!')
… This will print a talking cow on the terminal :
 _______________
< Blender is rad! >
  ===============
                   \
                    \
                      ^__^
                      (oo)\_______
                      (__)\       )\/\
                          ||----w |
                          ||     ||
6、 Using other code editors
You may prefer a different editor . It's very simple . Save the in process Blender Script ( with .py Extension ), Then open it in your preferred code editor . I used in this example Atom, As shown in the figure below . I have edited print() Parameters and saved the changes , This will prompt Blender The script editor displays a conflict resolution Button ( Red book icon with question mark on the cover ):

The conflict resolution icon is highlighted in green
If you click the button , You will be prompted with the reload from disk option ; This will be updated Blender Script editor to reflect our external editor (Atom?) Changes made in . One more Make text internal Options , It will script Blender The version is saved in .blend In file ( Together with the model 、 Material and scene data ). I prefer to Python Scripts are stored in separate files , So that I can choose to use external tools to process code and switch scripts at will .
You can also execute scripts directly from the command line , Without having to start completely Blender. however , You have to add some code to render the output / Visual results :
# foo.py
import bpy
bpy.ops.mesh.primitive_cone_add(location=(-3, 0, 0))
output = '/home/nuc/Desktop/render.png'
bpy.context.scene.render.filepath = output
bpy.ops.render.render(write_still=True)
This script adds a cone to the standard scene , Then render it to a file named render.png( On my desk ) In the file of . Please note that , I also save the script to my desktop . To run it , Enter my desktop directory and execute the following command :
<blender_dir>/blender --background --python foo.py
Of course , Need to use your blender Installation path replacement <blender_dir>. I use the image viewer to open the output file ( render.png ). If the image file is updated , Most viewers refresh , So every time blender On command , I will see the new rendering :
Be careful : You can press the up arrow key to repeat any command in the terminal .

Using the image viewer ( gThumb ) and Atom function Blender ‘headless’
What's better is , You can also configure the code editor to use keyboard shortcuts ( Not the terminal ) Run this command .
If you want a scenario that contains some actionable data , Please put .blend File is added to the command :
<blender_dir>/blender bar.blend --background --python foo.py
Blender The website provides more tips and techniques for writing code .
7、 Conclusion
In this short tutorial , I introduced some Blender Script Basics —— For single line Python Console 、 Can be set to enable Python Tooltips and options for developers' additional functions 、bpy Module and some of its properties and methods , And how to write animation . I also introduced some importing from other files Python Code and technology using external code editors .
But in Blender There are many places worth exploring in creative coding . Can be in GUI Any action performed in , Almost all of them can use Python Reproduce the code , Then use the algorithm you designed to go further .Blender The shader node system of is very suitable for creating shaders using visual scripting language .
If you are looking for something cool Blender Script , Try the following GitHub Topic search :blender-python and blender-scripts.
Link to the original text :Blender Creative programming — BimAnt
边栏推荐
- set、vector与list的构造与排序的耗时测试
- 等价域名
- Relationship between standardization, normalization and regularization
- vim怎么保存后退出
- Aller à l'école = gagner de l'argent? L'Académie des fées sans frais de scolarité!
- 【微信小程序】使出千手浮图—回滚式
- SSH connection to Huawei modelarts notebook
- How to deploy agent separately on the monitoring host -- wgcloud
- 【MySQL】MySQL的增删查改(进阶)
- Laravel generate sub table script example
猜你喜欢


 [email protected]@ZIF67纳米材料"/>
随机推荐
The magic of asynclocalstorage
ty_ Gr551x code framework
Online education knowledge payment website source code system + live broadcast + applet, installation tutorial
硫化铜纳米粒/ZIF-8复合材料([email protected]载体)|UiO-66/CoSO复合材料|ZIF-67纳米晶表面修饰六咪唑环三磷腈
Talking about the informatization planning of industrial enterprises
上学=挣钱?无需缴纳学费的神仙院校!
在华为ModelArts运行YOLOV3_coco_detection_dynamic_AIPP样例
ty_gr551x 代码框架
Software engineering - ranking of majors in Chinese Universities of Software Science
mof定制产品|N-K2Ti4O9/g-C3N4/UiO-66三元复合材料|纸基Au-AgInSe2-ZIF-8纳米复合材料
SSH Connection Huawei modelarts Notebook
Microsoft OneNote 教程,如何在 OneNote 中插入数学公式?
死锁、线程与进程讲解
Blender自动化建模入门
【附下载】带你使用frp实现内网穿透详细教程!
工程效能CI/CD之流水线引擎的建设实践
数据湖(十二):Spark3.1.2与Iceberg0.12.1整合
【OpenCV 例程200篇】233. 区域特征之矩不变量
Huawei ascend910 running yolov3 tutorial
Flink introduction to actual combat - phase IV (time and window diagram)