当前位置:网站首页>Use of urllib Library
Use of urllib Library
2022-07-19 07:05:00 【W_ chuanqi】
Personal profile
Author's brief introduction : Hello everyone , I am a W_chuanqi, A programming enthusiast
Personal home page :W_chaunqi
Stand by me : give the thumbs-up + Collection ️+ Leaving a message.
May you and I share :“ If you are in the mire , The heart is also in the mire , Then all eyes are muddy ; If you are in the mire , And I miss Kun Peng , Then you can see 90000 miles of heaven and earth .”

List of articles
urllib Use
First, introduce a Python library , called urllib, With it, we can achieve HTTP Send request , And you don't need to care HTTP The protocol itself is even lower level implementation , What we need to do is specify the requested URL、 Request header 、 Request body and other information . Besides urllib You can also convert the response returned by the server into Python object , Through this object, we can easily obtain the relevant information of the response , Such as response status code 、 Response head 、 Responder, etc .
First , Let's get to know urllib How to use the library , It is Python Built in HTTP Request Library , In other words, no additional installation is required , Can be used directly .urllib The library contains the following 4 A module .
- request: This is the most basic HTTP Request module , The sending of requests can be simulated . It's like entering the URL in the browser and pressing enter , Just pass on the library method URL And additional parameters , You can simulate the process of sending requests .
- error: Exception handling module . If a request exception occurs , Then we can catch these exceptions , Then try again or other operations to ensure that the program will not terminate unexpectedly .
- parse: A tool module . Provides a lot URL Treatment method , For example, split 、 analysis 、 Merger, etc .
- robotparser: Mainly used to identify the website robots.txt file , Then determine which websites can climb , Which websites cannot , It's actually used less .
1. Send a request
Use urllib Library request modular , You can easily send requests and get responses . Let's first look at its specific usage .
urlopen
urllib.request Module provides the most basic structure HTTP Requested method , This module can simulate the request initiation process of the browser , It also has the ability to handle authorization verification (Authentication )、 Redirect (Redirection)、 browser Cookie And some other functions .
Now let's experience request The power of the module . Here we use Python Take the official website , Let's grab this page ;
import urllib.request
response = urllib.request.urlopen('https://www.python.org')
print(response.read().decode('utf-8'))
The results are shown in the following figure :

We only use two lines of code here , And it's done Python Capture of official website , Output the source code of its web page . After getting the source code , The link we want 、 Picture address 、 Text information can be extracted ?
Next , See what the returned response is . utilize type Method to output the type of response :
import urllib.request
response = urllib.request.urlopen('https://www.python.org')
print(type(response))
The output is as follows :

It can be seen that , The response is a HTTPResposne Object of type , It mainly includes read、readinto、getheader、getheaders、fileno Other methods , as well as msg、version、status、reason、debuglevel、closed Equal attribute .
After getting the response , We assign it to response Variable , Then you can call the above methods and properties , Get a series of information about the returned result .
for example , call read Method can get the response web page content 、 call status Property to get the status code of the response result ( 200 On behalf of the successful request ,404 Represents that the web page is not found, etc ).
Let's take another example to see :
import urllib.request
response = urllib.request.urlopen('https://www.python.org')
print(response.status)
print(response.getheaders())
print(response.getheader('Server'))
The operation results are as follows :

The first two outputs are the status code of the response and the header information of the response ; The last output is the call getheader Method , And pass in parameters Server, Get the response header Server Value , The result is nginx, It means that the server uses Nginx Built .
Take advantage of the most basic urlopen Method , It has been able to complete the design of simple web pages GET Request to grab .
If you want to pass some parameters to the link , How to achieve it ? Let's look at it first urlopen Methodical API:
urllib.request.urlopen(url, data=None,[timeout,]*, cafile-None, capath-None, cadefault=False, context-None)
You can find , Except that the first parameter is used to pass URL outside , We can also deliver other content , for example data( Additional data )、timeout( Timeout time ) etc. .
Next, let's explain in detail urlopen Usage of several parameters in method .
data Parameters
data Parameters are optional . When adding this parameter , Need to use bytes Method converts the parameter to the content of byte stream encoding format , namely bytes type . in addition , If this parameter is passed , Then its request method is no longer GET, It is POST 了 .
Let's take a look at :
import urllib.parse
import urllib.request
data = bytes(urllib.parse.urlencode({
    'name':'germey'}), encoding='utf-8')
response = urllib.request.urlopen('https://www.httpbin.org/post', data=data)
print(response.read().decode('utf-8'))
Here we pass a parameter name, The value is germey, It needs to be transcoded into bytes type . Transcoding adopts bytes Method , The first parameter of this method must be str( character string ) type , So with urllib.parse In the module urlencode Method converts dictionary parameters to strings ; The second parameter is used to specify the encoding format , This is designated as utf-8.
The site we requested here is www.httpbin.org, It can provide HTTP Request test . This time we ask URL by https://www.httpbin.org/post, This link can be used to test POST request , Be able to output some requested information , One of them is
Including the data Parameters .
The running results of the above example are as follows :

We can find that the parameters we passed appear in form Field , This indicates that the form is mock submitted , With POST Mode transfer data .
timeout Parameters
timeout Parameter is used to set the timeout , The unit is in seconds , It means that if the request exceeds the set time , No response yet , Will throw an exception . If this parameter is not specified , The global default time will be used . This parameter supports HTTP、HTTPS,FTP request .
Let's take a look at :
import urllib.request

response = urllib.request.urlopen('https://www.httpbin.org/get', timeout=0.1)
print(response.read())
The operation results may be as follows :
Here we set the timeout to 0.1 second . The program is running 0.1 Seconds later , The server is still not responding , So he threw URLError abnormal . The exception belongs to urllib.error modular , The cause of the error is timeout .
Therefore, you can set this timeout , When a web page does not respond for a long time , Just skip grabbing it . Besides , utilize try except Statements can also implement , The relevant code is as follows :
import socket
import urllib.request
import urllib.error

try:
    response = urllib.request.urlopen(
        'https://www.httpbin.org/get', timeout=0.1)
except urllib.error.URLError as e:
    if isinstance(e.reason, socket.timeout):
        print('TIME OUT')
Here we ask https://www.httpbin.org/get This test link , Set the timeout to 0.1 second , Then capture URLError This anomaly , And determine the exception type is socket.timeout, It means timeout exception , Therefore, it is concluded that the error is indeed reported due to timeout , Finally, the printout TIME OUT.
The operation results are as follows :

According to common sense ,0.1 It is almost impossible to get a response from the server in seconds , So the output is TIME OUT A hint of .
By setting timeout Parameter implements timeout processing , Sometimes it's useful .
The other parameters
except data Parameters and timeout Parameters ,urlopen There are ways context Parameters , The parameter must be ssl.SSLContext type , Used to specify SSL Set up .
Besides ,cafile and capath These two parameters are used to specify CA Certificate and its path , These two are asking HTTPS Useful when linking .
cadefault Parameters are now deprecated , The default value is False.
Request
utilize urlopen Method can initiate the most basic request , But its few simple parameters are not enough to build a complete request . If you need to add Headers Etc , We have to take advantage of stronger Request Class to build the request .
First , Let's feel it with examples Request The use of the class :
import urllib.request

request = urllib.request.Request('https://python.org')
response = urllib.request.urlopen(request)
print(response.read().decode('utf-8'))
You can find , We still use urlopen Method to send the request , But this time the parameter of this method is no longer URL, It is a Request Object of type . By constructing this data structure , On the one hand, the request can be separated into an object , On the other hand, the parameters can be configured more richly and flexibly .
Now let's see what parameters can be used to construct Request class , The construction method is as follows :
class urllib.request.Request(url, data=None, headers={},origin_req_host=None, unverifiable=False, method=None)
The first parameter url For the request URL, This is a required parameter , The rest are optional parameters .
The second parameter data If you want to transfer data , Must pass bytes Type of . If the data is a dictionary , You can use first urllib.parse In the module urlencode Method to code .
The third parameter headers It's a dictionary , This is the request header , When we construct the request , Either through headers Parameters directly construct this item , You can also request an instance by calling add_header Method add .
The most common way to add a request header is by modifying User-Agent To disguise the browser . default User-Agent yes Python-urllib, We can disguise the browser by modifying this value . For example, camouflage Firefox , You can put the User-Agent Set to :
Mozilla/5.0(X11; U; Linux i686)Gecko/20071127 Firefox/2.0.0.11
Fourth parameter origin_req_host Refers to the requesting party's host Name or IP Address .
Fifth parameter unverifiable Indicates whether the request is unverifiable , The default value is False, It means that the user does not have sufficient permission to receive the result of this request . for example , Request one HTML Pictures in the document , But there is no permission to automatically capture images , At this time unverifiable The value is True.
Sixth parameter method Is a string , Used to indicate the method used by the request , for example GET、POST and PUT etc. .
Next, let's try to build Request class :
from urllib import request, parse

url = 'https://www.httpbin.org/post'
headers = {

    'User-Agent': 'Mozilla/4.0 (compatible;MSIE 5.5;Windows NT)',
    'Host': 'www.httpbin.org'
}
dict = {
    'name': 'germey'}
data = bytes(parse.urlencode(dict), encoding='utf-8')
req = request.Request(url=url, data=data, headers=headers, method='POST')
response = request.urlopen(req)
print(response.read().decode('utf-8'))
Here we go through 4 Parameters construct a Request class , Among them url I.e. request URL,headers Specified in User-Agent and Host,data use urlencode Methods and bytes Method to convert dictionary data into byte stream format . in addition , The request method is specified as POST.
The operation results are as follows :
Observations show that , We successfully set up data、headers and method.
adopt add_header Method add headers This is done as follows :
req= request.Request(url=url, data=data, method='posT')
req.add_header('User-Agent','Mozilla/4.0 (compatible; MSIE 5.5; Windows NT)')
With Request class , We can more easily build requests , And realize the sending of the request .
Advanced usage
We are ready to build the request , So for some more advanced operations ( for example Cookie Handle 、 Agent settings, etc ), How to achieve it ?
At this time, more powerful tools are needed , therefore Handler Debut . In short ,Handler It can be understood as various processors , There are special for login authentication 、 Handle Cookie Of 、 Handle proxy settings . Take advantage of these Handler, We can almost achieve HTTP All functions in the request .
Let's first introduce urllib.request In the module BaseHandler class , This is everything else Handler The parent of a class . It provides the most basic method , for example default_open、protocol_request etc. .
There will be all kinds of Handler A subclass inherits BaseHandler class , Next, I will give some examples of subclasses as follows .
- HTTPDefaultErrorHandler Used for processing HTTP Response error , All errors will be thrown HTTPError Exception of type .
- HTTPRedirectHandler Used to handle redirection .
- HTTPCookieProcessor Used for processing Cookie.
- ProxyHandler Used to set up agents , The proxy is empty by default .
- HTTPPasswordMgr For managing passwords , It maintains a comparison table of user names and passwords .
- HTTPBasicAuthHandler Used to manage authentication , If a mirror joint needs certification when it is opened , Then you can use this class to solve the authentication problem .
Another important class is CpenerDirector, We can call it Qpener. We used it before uhopen Method , It's actually urllib Library provides us with a Opener.
that , Why draw people Opener Well ? Because you need to implement more advanced functions . Used before Request Classes and urlopen Class is equivalent to the extremely common request method encapsulated in the class library , These two classes can be used to complete basic requests , But now we need to implement more advanced functions , You need to go deep into the human layer to configure , Use a lower level instance to complete the operation . So it's used here Opener.
Qpener Class can provide open Method , The response type returned by this method and ulopen The method is the same . that ,Opener Classes and Handler What does class have to do with ? In short , utilize Handler Class to build Qpener class .
Here are some examples Handler Classes and Opener The use of the class .
verification
When visiting certain websites , for example htps/ssr3 .serape.center, Such an authentication window may pop up , As shown below .
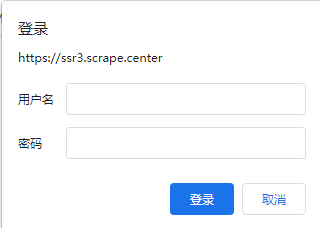
In this case , It means that this website has enabled basic identity authentication , English is called HTTP Basic Access Authentication , This is a login authentication method , Allow web browsers or other client programs to provide identity credentials in the form of user names and passwords when requesting websites .
So how does a crawler request such a page ? With the help of HTTPBasicAuthHandler Module can be completed , The relevant code is as follows :
from distutils.log import error
from urllib.error import URLError
from urllib.request import HTTPPasswordMgrWithDefaultRealm, HTTPBasicAuthHandler, build_opener
from urllib.error import URLError

username = 'admin'
password = 'admin'
url = 'https://ssr3.scrape.center/'

p = HTTPPasswordMgrWithDefaultRealm()
p.add_password(None, url, username, password)
auth_handler = HTTPBasicAuthHandler(p)
opener = build_opener(auth_handler)

try:
    result = opener.open(url)
    html = result.read().decode('utf-8')
    print(html)
except URLError as e:
    print(e.reason)
Here we first instantiate a HTTPBasicAuthHandler object auth_handler, The parameter is HTTPPasswordMgrwithDefaultRealm object , It USES add_ password Method to add user name and password , In this way, a system for processing validation is established Handler class .
Then the newly established auth_handler Class is passed as a parameter build_opener Method , Construct a Opener, This Opener When the request is sent, it is equivalent to that it has been verified successfully .
The use of Opener Class open Method to open the link , You can complete the verification . The result obtained here is the source code content of the page after successful verification .
agent
When I was a reptile , You have to use an agent , If you want to add a proxy , You can do this :
from urllib.error import URLError
from urllib.request import ProxyHandler, build_opener

proxy_handler = ProxyHandler({

    'http': 'http: // 127.0.0.1: 8080',
    'https': 'https: // 127.0.0.1: 8080'
})

opener = build_opener(proxy_handler)
try:
    response = opener.open('https://www.baidu.com')
    print(response.read().decode('utf-8'))
except URLError as e:
    print(e.reason)
Here we need to build a local HTTP agent , And let it run in 8080 On port .
It USES Proxy_Handler, Its parameter is a dictionary , The key name is the protocol type ( for example HTTP perhaps HTTPS etc. ) The key value is the proxy link , You can add multiple agents .
And then use this Handler and build_opener Method builds a Opener, Then send the request .
Cookie
Handle Cookie Need to use relevant Handler.
Let's first use examples to see how to get the website Cookie, The relevant code is as follows :
import http.cookiejar
import urllib.request

cookie = http.cookiejar.CookieJar()
handler = urllib.request.HTTPCookieProcessor(cookie)
opener = urllib.request.build_opener(handler)
response = opener.open('https://www.baidu.com')
for item in cookie:
    print(item.name+"="+item.value)
First , Must declare a CookieJar object . Then we need to use HTTPCookieProcessor Construct a Handler, The use of build_ opener Methods build Opener, perform open Function .
The operation results are as follows :

You can see , Here we output each Cookie The name and value of the entry .
Since it can output , Can I output the contents in file format ? We know Cookie In fact, it is also in the form of text . So the answer is certainly yes , Let's take a look at the following examples :
import urllib.request, http.cookiejar
filename ='cookie.txt'
cookie = http.cookiejar.MozillaCookieJar(filename)
handler = urllib.request.HTTPCookieProcessor(cookie)
opener = urllib.request.build_opener(handler)
response = opener.open('https://www.baidu.com')
cookie.save(ignore_discard-True, ignore_expires=True)
At this time, we need to CookieJar Switch to MozillaCookieJar, It will be used when generating files , yes CookieJar Subclasses of , It can be used to deal with Cookie Document related events , For example, read and save Cookie, Can be Cookie Save as Mozilla Type browser Cookie Format .
After running the above instance , You will find that a cookie.txt file , The contents of the document are as follows :
[ Failed to transfer the external chain picture , The origin station may have anti-theft chain mechanism , It is suggested to save the pictures and upload them directly (img-CGkZeRID-1657119789554)(https://s2.loli.net/2022/07/03/weEGvNAlMKLCrP6.png)]
in addition ,LWPCookieJar It can also be read and saved Cookie, It's just Cookie File storage format and MozillaCookieJar Dissimilarity , It will be saved as LWP(libwww-perl) Format .
Keep LWP Format Cookie file , It can be modified at the time of declaration :
cookie = http.cookiejar.LWPCookieJar(filename)
The generated content is as follows :

It seems , In different formats Cookie The file difference is still relatively large .
that , Generate Cookie After the document , How to read content from it and use it ?
Now let's LWPCookieJar Take the format as an example :
import urllib.request, http.cookiejar
cookie = http.cookiejar.LwPCookieJar()
cookie.load(`cookie.txt', ignore_discard-True, ignore_expires-True)
handler = urllib.request.HTiPCookieprocessor(cookie)
opener - urllib.request.build_opener(handler)
response = opener.open('https://wmw.baidu.com')
print(response.read().decode('utf-8'))
You can see , This call load Method to read the local Cookie file , Got Cookie The content of . The premise of this is that we first generate LWPCookieJar Format Cookie, And saved as a file . Read Cookie after , Use the same method to build Handler Classes and Opener Class to complete the operation .
If the operation results are normal , Will output the source code of Baidu web page .
Use the above method , We can set the functions of most requests .
2. Handling exceptions
We have learned how to send a request , But when the network is bad , If there is an exception , What to do ? At this time, if you don't handle these exceptions , The program is likely to terminate because of an error , Therefore, exception handling is still very necessary .
urllib In the library error The module defines by request Module generated exception . When something goes wrong ,request The module will throw error Exception defined in module .
URLError
URLError Class from urllib Library error modular , Inherited from OSError class , yes error Exception module base class , from request Any exception generated by a module can be handled by capturing this class .
It has an attribute reason, That is, return the cause of the error .
Let's take a look at... With an example :
from urllib import request, error

try:
    response = request.urlopen('https://cuiqingcai.com/404')
except error.URLError as e:
    print(e.reason)
We opened a non-existent page , Normally, it should report an error , But we caught URLError This anomaly , The operation results are as follows :

The program does not report errors directly , Instead, the reason for the error is output , This can avoid abnormal termination of the program , At the same time, exceptions are effectively handled .
HTTPError
HTTPError yes URLError Subclasses of , Used exclusively to deal with HTTP Request error , For example, the authentication request fails . It has the following 3 Attributes .
- code: return HTTP Status code , for example 404 Indicates that the web page does not exist ,500 Indicates internal server error, etc .
- reason: Same as the parent class , Used to return the cause of the error .
- headers: Return request header .
Let's use a few examples to see :
from urllib import request, error

try:
    response = request.urlopen('https://cuiqingcai.com/404')
except error.HTTPError as e:
    print(e.reason, e.code, e.headers, sep='\n')
The operation results are as follows :

Still open the same website , It's captured here HTTPError abnormal , Output Teason、code benefit headers attribute .
because URLError yes HTTPError Parent class of , So you can choose to catch the errors of the subclass first , Then catch the error of the parent class , So the better way to write the above code is as follows :
from urllib import request, error

try:
    response = request.urlopen('https://cuiqingcai.com/404')
except error.HTTPError as e:
    print(e.reason, e.code, e.headers, sep='\n')
except error.URLError as e:
    print(e.reason)
else:
    print('Request Successfully')
In this way, you can capture HTTPError, Get its error reason 、 Status code 、 Ask for first-class information . If not HTTPError abnormal , Will capture URLError abnormal , Output error reason . Last , use else Statement to handle normal logic . This is a better way to write exception handling .
occasionally ,reason Property does not necessarily return a string , It could also be an object . Take another look at the following example :
import socket
import urllib.request
import urllib.error
try:
    response = urllib.request.urlopen('https://ww.baidu.com', timeout=0.01)
except urllib.error.URLError as e:
    print(type(e.reason))
    if isinstance(e.reason, socket.timeout):
        print('TIME OUT')
Here, we directly set the timeout to force the throw timeout abnormal .
The operation results are as follows :

You can find ,reason The result of the property is .socket.timeout class . So you can use isinstance Method to determine its type , Make more detailed exception judgment .
3. Parsing Links
As I said before ,urllib Kuri also provided parse modular , This module defines the processing URL Standard interface for , For example, implement URL The extraction of each part , Merge and link conversion . It supports the following protocol URL Handle :file、fip、gopher、hdl、http、https、imap、mailtio、mms、news、nntp、prospero、rsync、rtsp、rtspu、 sftp、sip、sips、snews、svn、svn+ssh、telnet and wais.
Next we will introduce parse Common methods in modules , Take a look at its convenience .
urlparse
This method can realize URL Identification and segmentation of , Here's an example :
from urllib.parse import urlparse
result = urlparse('https://www.baidu.com/index.html;user?id=5#comment')
print(type(result))
print(result)
Here we use urlparse Method to one URL It's parsed , Then the type of the parsing result and the result itself are output . The operation results are as follows :

You can see , The analytic result is a ParseResult Object of type , contain 6 part , Namely scheme、netloc、path、params、query and fragment.
Take another look at URL:
https://www.baidu.com/index.html;user?id=5#comment
You can find ,urlparse Method is parsing URL Sometimes there is a specific separator . for example :// The previous content is scheme, On behalf of the agreement . first / The symbol is preceded by netloc, Domain name ; And then path, Access path . A semicolon ; And then params, On behalf of the parameter . question mark ? After that is the query criteria query, Generally used as GET Type of URL. Well No # Then there is the anchor point fragment, Used to directly locate the drop-down position inside the page .
So we can get a standard link format , As follows :
scheme://netloc/path;params?query#fragment
A standard URL Will fit the rules , utilize urlparse Method can split it .
In addition to this basic way of analysis ,urlparse Is there any other configuration for the method ? Next , Take a look at it API usage :
urllib.parse.urlparse(urlstring, scheme='', allow_fragments=True)
You can see ,urlparse There are methods 3 Parameters .
urlstring: This is required , That is, to be resolved URL.
scheme: This is the default protocol ( for example http or htps etc. ). If the to be resolved URL There is no agreement information , This will be the default protocol . Let's take a look at :
from urllib.parse import urlparse
result = urlparse('www.baidu.com/index.html;user?id=5#comment', scheme='https')
print(result)
The operation results are as follows :
You can find , Here's what's provided URL It does not contain the first agreement information , But by default scheme Parameters , Returned the result https.
Suppose you bring the agreement information :
result = urlparse(
    'https://www.baidu.com/index.html;user?id=5#comment', scheme='https')
The results are as follows :
so ,scheme Parameter only in URL It takes effect only when the agreement information is not included in . If URL There is , Will return the parsed scheme.
allow_fragments: Whether to ignore fragment. If this item is set to False, that fragment Probing points will be ignored , It will be parsed as path、params perhaps query Part of , and fragment Part is empty .

Let's take a look at :
from urllib.parse import urlparse

result = urlparse(
    'https://www.baidu.com/index.html;user?id=5#comment', allow_fragments=False)
print(result)
The operation results are as follows :

hypothesis URL Contains no params and query, Let's take a look at it through an example :
from urllib.parse import urlparse

result = urlparse(
    'https://www.baidu.com/index.html#comment', allow_fragments=False)
print(result)
The operation results are as follows :

You can find , here fragment It will be resolved to path Part of .
Return results ParseResult It's actually a tuple , You can use the attribute name to get its content , You can also use the index to get . Examples are as follows :
from urllib.parse import urlparse

result = urlparse(
    'https://www.baidu.com/index.html#comment', allow_fragments=False)
print(result.scheme, result[0], result.netloc, result[1], sep='\n')
Here we use attribute name and index to get scheme and netloc, The operation results are as follows :

You can find , Both acquisition methods can be successfully obtained , And the results are consistent .
urlunparse
With urlparse Method , Accordingly, there will be its opposite method urlunparse, Is used to construct URL. The parameter received by this method is an iteratable object , Its length must be 6, Otherwise, the problem of insufficient or too many parameters will be thrown . Let's take a look at :
from urllib.parse import urlunparse

data = ['https', 'www.baidu.com', 'index.html', 'user', 'a=6', 'comment']
print(urlunparse(data))
Here are the parameters data Used list type . Of course , Other types can also be used , For example, tuples or specific data structures .
The operation results are as follows :

In this way, we succeeded in achieving URL Construction .
urlsplit
This method and urlparse The method is very similar , But it doesn't parse alone anymore params This part (params Will merge into path in ). Only return 5 results . Examples are as follows :
from urllib.parse import urlsplit

result = urlsplit('https://www.baidu.com/index.html;user?id=5#comment')
print(result)
The operation results are as follows :

You can find , The return is SplitResult, This is also a tuple , You can use the attribute name to get its value , You can also use the index to get . Examples are as follows :
from urllib.parse import urlsplit

result = urlsplit('https://www.baidu.com/index.html;user?id=5#comment')
print(result.scheme, result[0])
The operation results are as follows :

urlunsplit
And urlunparse The method is similar to , This is also the way to combine all parts of the link into a complete link , The argument passed on is also an iteratable object , For example, a list of 、 Tuples etc. , The only difference is that the length of the parameter here must be 5. Examples are as follows :
from urllib.parse import urlunsplit

data = ['https', 'www.baidu.com', 'index.html', 'a=6', 'comment']
print(urlunsplit(data))
The operation results are as follows :

urljoin
urlunparse and urlunsplit Methods can complete the merging of links , But the premise is that there must be objects of a specific length , Every part of the link should be clearly separated .
In addition to these two methods , There is another way to generate links , yes urljoin. We can provide one base_url( Basic links ) As the first parameter of the method , Take the new link as the second parameter .urljoin Method analysis base_url Of scheme,netloc and path this 3 A content , And add the missing part of the new link , Last result returned .
Let's take a look at :
from urllib.parse import urljoin

print(urljoin('https://www.baidu.com', 'FAQ.html'))
print(urljoin('https://www.baidu.com', 'https://cuiqingcai.com/FAQ.html'))
print(urljoin('https://www.baidu.com/about.html', 'https://cuiqingcai.com/FAQ.html'))
print(urljoin('https://www.baidu.com/about.html',
      'https://cuiqingcai.com/FAQ.html?question=2'))
print(urljoin('https://www.baidu,com?wd=abc', 'https://cuiqingcai.com/index.php'))
print(urljoin('https://www.baidu.com', '?category=2#comment'))
print(urljoin('www.baidu.com', '?category=2#comment'))
print(urljoin('www.baidu.com#comment', '?category=2'))
The operation results are as follows :

You can find ,base_url Three items are provided :scheme、netloc and path. If these three items do not exist in the new link , I'll add ; If there is , Just use the new link ,base_url What is in does not work .
adopt urljoin Method , We can easily parse Links 、 Merging and generating .
urlencode
Here's another common method ——urlencode, It's building GET It's very useful when requesting parameters , Examples are as follows :
from urllib.parse import urlencode

params = {
    'name': 'germey', 'age': '25'}
base_url = 'https://www/baidu.com?'
url = base_url+urlencode(params)
print(url)
Here we first declare a dictionary params, Used to express parameters , And then call urlencode Methods will params Serialize to GET Requested parameters .
The operation results are as follows :

You can see , Parameter has been successfully converted from dictionary type to GET Request parameters .
urlencode Methods are very common . Sometimes to make it easier to construct parameters , We will use a dictionary to express the parameters in advance , Then convert the dictionary into URL Parameter time , Just call the method .
parse_qs
With serialization , There must be deserialization . utilize parse_qs Method , You can put a string of GET Request parameters back to dictionary , Examples are as follows :
from urllib.parse import parse_qs

query = 'name=germey&age=25'
print(parse_qs(query))
The operation results are as follows :

You can see ,URL The parameter of was successfully converted back to dictionary type .
parse_qsl
parse_qsl Method is used to convert parameters into a list of tuples , Examples are as follows :
from urllib.parse import parse_qsl

query = 'name=germey&age=25'
print(parse_qsl(query))
The operation results are as follows :

You can see , The result of the run is a list , Each element in the list is a tuple , The first content of the tuple is the parameter name , The second is parameter values .
quote
This method can transform content into URL Encoding format . When URL When Chinese parameters are included in , It may cause garbled code , Use at this time quote Method can convert Chinese characters into URL code , Examples are as follows :
from urllib.parse import quote

keyword = ' wallpaper '
url = 'https://www.baidu.com/s?wd='+quote(keyword)
print(url)
Here we declare a Chinese search text , And then use quote Methods to study it URL code , The results are as follows :

unquote
With quote Method , Of course unquote Method , It can do URL decode , Examples are as follows :
from urllib.parse import unquote

url = 'https://www.baidu.com/s?wd=%E5%A3%81%E7%BA%B8'
print(unquote(url))
there url It's from above URL Coding results , utilize unquote Method to restore it , give the result as follows :

You can see , utilize unquote Method can be easily decoded .
In this section we introduce parse Some of the commonly used modules URL processing method . With these methods , We can easily achieve URL Analysis and construction of , It is recommended to master .
4. analysis Robots agreement
utilize urllib Library robotparser modular , Can analyze the website Robots agreement . Let's briefly understand the usage of this module .
Robots agreement
Robots The protocol is also called the crawler protocol 、 Robot protocol , The full name is web crawler exclusion criteria (Robots Exclusion Protocol), Used to tell crawlers and search engines which pages can be crawled 、 What can't be . It is usually called robots.txt Text file for , It is usually placed in the root directory of the website .
Search crawls out when visiting a site , First of all, we will check whether the root directory of this site exists robots.txt file 、 If there is , You will crawl according to the crawl range defined therein . If you don't find this file , The search crawler will access all directly accessible pages .
Let's take a look at robots.txt Example :
User-agent:*
Disallow:/
Allow:/public/
This limits all search crawlers to crawl public Catalog . Save the above as robots.txt file , Put it under the overview of the website , And the portal file of the website ( for example index.php、index.html and index.jsp etc. ) Put together .
In the example above User-agent Describes the name of the search crawler , Here it's set to *, representative Robots The protocol is valid for all crawling crawlers . for example , We can set it like this :
User-agent: BaiduSpider
This means that the rules set are effective for Baidu crawler . If there are more than one User-agent Record , It means that multiple crawlers will be restricted by crawling , But at least one... Needs to be specified .
Disallow Specified a directory that crawlers are not allowed to crawl , The above example is set to /. It means that crawling all pages is not allowed .
Allow It is not used alone , Hui He Disallow Together with , To remove certain restrictions . In the above example, we set it to /public/, combination Disallow Set up , Indicates that all pages are not allowed to crawl , But you can crawl public daily record of events .
Here are a few more examples . The code that prohibits all crawlers from accessing all directories is as follows :
User-agent:*
Disallow:/
The code that allows all crawlers to access all directories is as follows :
User-agent:*
Disallow:
in addition , Put... Directly robots.txt It's OK to leave the file blank .
The code that prohibits all crawlers from accessing some directories of the website is as follows :
User-agent:*
Disallow:/private/
Disallow:/tmp/
The code that allows only one crawler to access all directories is as follows :
User-agent:WebCrawler
Disallow:
User-agent:*
Disallow:/
Above is robots.txt Some common ways of writing .
Reptile name
You may wonder , Where did the reptile name come from ? Why is it called ? Actually, reptiles have fixed names , For example, Baidu's crawler is called Baiduspider. The following table lists the names of some common search crawlers and their corresponding websites .
| Reptile name | Website name |
|---|---|
| Baiduspider | Baidu |
| Googlebot | |
| 360Spider | 360 Search for |
| YodaoBot | youdao |
| ia_archiver | Alexa |
| Scooter | altavista |
| Bingbot | Bing Ying |
robotparser
understand Robots After the agreement , You can use robotparser Module to parse robots.txt The file . This module provides a class RobotFileParser, It can be based on the robots.txt File to determine whether a crawler has permission to crawl this web page .
This class is very simple to use , Just pass it on in the construction method robots.txt Just link to the file . First look at its statement :
urllib.robotparser.RobotFileParser(url='')
Of course , You can also not pass it on at the time of declaration robots.txt Link to file , Let it default to empty , Final use set_url() Method can also be set .
The following is listed RobotFileParser Class .
- set_url: Used to set robots.txt Link to file . If you're creating RobotFileParser Object passed in a link , You don't need to use this method to set .
- read: Read robots.txt Document and analyze . Be careful , This method performs read and analyze operations , If you don't call this method , The next judgment will be False, So remember to call this method . This method does not return anything , But a read operation was performed .
- parse: Used to resolve robots.txt file , The parameters passed on are robots.txt The contents of some lines in the file , It will follow robots.txt To analyze these contents .
- can_fetch: This method has two parameters , The first is User-Agent, The second is to grab URL. The return is True or False, Express User-Agent Indicates whether the search engine can grab this URL.
- mtime: Return to the last capture and Analysis robots.txt Time of file , This is useful for long-term analysis and crawling robots.txt File search crawler is necessary , You may need to check regularly to catch the latest robots.txt file .
- modified: It is also useful for long-term analysis and crawling of search crawlers , You can set the current time to the last capture and analysis robots.txt Time of file .
Let's take a look at :
from urllib.robotparser import RobotFileParser

rp = RobotFileParser()
rp.set_url('https://www.baidu.com/robots.txt')
rp.read()
print(rp.can_fetch('Baiduspider', 'https://www.baidu.com'))
print(rp.can_fetch('Baiduspider', 'https://www.baidu.com/homepage/'))
print(rp.can_fetch('Cooglebot', 'https://www.baidu.com/homepage/'))
Take Baidu for example , First, I created a RobotFileParser object rp, And then through set_url Method set robots.txt Link to file . Of course , If not set_url Method , You can directly use the following methods when declaring objects :
rp=RobotFileParser('https://www.baidu.com/robots.txt')
Then use can_fetch Method to determine whether the web page can be crawled . The operation results are as follows :

You can see , Here we use Baiduspider You can grab Baidu's home page and homepage page , however Googlebot Can't grab homepage page .
Open Baidu's robots.txt file , You can see the following information :
User-agent: Baiduspider
Disallow: /baidu
Disallow: /s?
Disallow: /ulink?
Disallow: /link?
Disallow: /home/news/data/
Disallow: /bh

User-agent: Googlebot
Disallow: /baidu
Disallow: /s?
Disallow: /shifen/
Disallow: /homepage/
Disallow: /cpro
Disallow: /ulink?
Disallow: /link?
Disallow: /home/news/data/
Disallow: /bh

User-agent: MSNBot
Disallow: /baidu
Disallow: /s?
Disallow: /shifen/
Disallow: /homepage/
Disallow: /cpro
Disallow: /ulink?
Disallow: /link?
Disallow: /home/news/data/
Disallow: /bh

User-agent: Baiduspider-image
Disallow: /baidu
Disallow: /s?
Disallow: /shifen/
Disallow: /homepage/
Disallow: /cpro
Disallow: /ulink?
Disallow: /link?
Disallow: /home/news/data/
Disallow: /bh

User-agent: YoudaoBot
Disallow: /baidu
Disallow: /s?
Disallow: /shifen/
Disallow: /homepage/
Disallow: /cpro
Disallow: /ulink?
Disallow: /link?
Disallow: /home/news/data/
Disallow: /bh

User-agent: Sogou web spider
Disallow: /baidu
Disallow: /s?
Disallow: /shifen/
Disallow: /homepage/
Disallow: /cpro
Disallow: /ulink?
Disallow: /link?
Disallow: /home/news/data/
Disallow: /bh

User-agent: Sogou inst spider
Disallow: /baidu
Disallow: /s?
Disallow: /shifen/
Disallow: /homepage/
Disallow: /cpro
Disallow: /ulink?
Disallow: /link?
Disallow: /home/news/data/
Disallow: /bh

User-agent: Sogou spider2
Disallow: /baidu
Disallow: /s?
Disallow: /shifen/
Disallow: /homepage/
Disallow: /cpro
Disallow: /ulink?
Disallow: /link?
Disallow: /home/news/data/
Disallow: /bh

User-agent: Sogou blog
Disallow: /baidu
Disallow: /s?
Disallow: /shifen/
Disallow: /homepage/
Disallow: /cpro
Disallow: /ulink?
Disallow: /link?
Disallow: /home/news/data/
Disallow: /bh

User-agent: Sogou News Spider
Disallow: /baidu
Disallow: /s?
Disallow: /shifen/
Disallow: /homepage/
Disallow: /cpro
Disallow: /ulink?
Disallow: /link?
Disallow: /home/news/data/
Disallow: /bh

User-agent: Sogou Orion spider
Disallow: /baidu
Disallow: /s?
Disallow: /shifen/
Disallow: /homepage/
Disallow: /cpro
Disallow: /ulink?
Disallow: /link?
Disallow: /home/news/data/
Disallow: /bh

User-agent: ChinasoSpider
Disallow: /baidu
Disallow: /s?
Disallow: /shifen/
Disallow: /homepage/
Disallow: /cpro
Disallow: /ulink?
Disallow: /link?
Disallow: /home/news/data/
Disallow: /bh

User-agent: Sosospider
Disallow: /baidu
Disallow: /s?
Disallow: /shifen/
Disallow: /homepage/
Disallow: /cpro
Disallow: /ulink?
Disallow: /link?
Disallow: /home/news/data/
Disallow: /bh


User-agent: yisouspider
Disallow: /baidu
Disallow: /s?
Disallow: /shifen/
Disallow: /homepage/
Disallow: /cpro
Disallow: /ulink?
Disallow: /link?
Disallow: /home/news/data/
Disallow: /bh

User-agent: EasouSpider
Disallow: /baidu
Disallow: /s?
Disallow: /shifen/
Disallow: /homepage/
Disallow: /cpro
Disallow: /ulink?
Disallow: /link?
Disallow: /home/news/data/
Disallow: /bh

User-agent: *
Disallow: /
It's not hard to see. , Baidu robots.txt No restrictions on files Baiduspider For Baidu homepage Page crawling , Limit Googlebot Yes homepage Page crawling .
You can also use parse Method executes on robots.txt File reading and analysis , Examples are as follows :
from urllib.request import urlopen
from urllib.robotparser import RobotFileParser

rp = RobotFileParser()
rp.parse(urlopen('https://www.baidu.com/robots.txt').read().decode('utf-8').split('\n'))
print(rp.can_fetch('Baiduspider', 'https://www.baidu.com'))
print(rp.can_fetch('Baiduspider', 'https://www.baidu.com/homepage/'))
print(rp.can_fetch('Googlebot', 'https://www.baidu.com/homepage/'))
The results are the same :

This section describes robotparser Basic usage and examples of modules , Use this module , We can easily determine which pages can be crawled 、 Which pages cannot .
llow: /bh
User-agent: yisouspider
Disallow: /baidu
Disallow: /s?
Disallow: /shifen/
Disallow: /homepage/
Disallow: /cpro
Disallow: /ulink?
Disallow: /link?
Disallow: /home/news/data/
Disallow: /bh
User-agent: EasouSpider
Disallow: /baidu
Disallow: /s?
Disallow: /shifen/
Disallow: /homepage/
Disallow: /cpro
Disallow: /ulink?
Disallow: /link?
Disallow: /home/news/data/
Disallow: /bh
User-agent: *
Disallow: /
It's not hard to see. , Baidu robots.txt No restrictions on files Baiduspider For Baidu homepage Page crawling , Limit Googlebot Yes homepage Page crawling .
You can also use parse Method executes on robots.txt File reading and analysis , Examples are as follows :
```python
from urllib.request import urlopen
from urllib.robotparser import RobotFileParser
rp = RobotFileParser()
rp.parse(urlopen('https://www.baidu.com/robots.txt').read().decode('utf-8').split('\n'))
print(rp.can_fetch('Baiduspider', 'https://www.baidu.com'))
print(rp.can_fetch('Baiduspider', 'https://www.baidu.com/homepage/'))
print(rp.can_fetch('Googlebot', 'https://www.baidu.com/homepage/'))
The results are the same :
[ Outside the chain picture transfer in …(img-zEmOU1c3-1657119789561)]
This section describes robotparser Basic usage and examples of modules , Use this module , We can easily determine which pages can be crawled 、 Which pages cannot .
边栏推荐
- Ucloud Shanghai arm cloud server evaluation
- m基于Simulink的高速跳频通信系统抗干扰性能分析
- 传奇怎么开服?开传奇私服需要准备什么呢?
- 剑指Offer刷题记录——Offer 04. 二维数组中的查找
- Xiaodi network security - Notes (3)
- Postage range (array or + function)
- 快速学会cut命令,uniq命令的使用
- Mapping rule configuration of zuul route
- [ restartedMain] o.s.b.d.LoggingFailureAnalysisReporter :
- slackware 14.2 安装KDE 5 plasma
猜你喜欢

m3GPP-LTE通信网络中认知家庭网络Cognitive-femtocell性能matlab仿真

论文阅读:Deep Residual Learning in Spiking Neural Networks

cookie、session的配置和使用

Steam游戏服务器配置选择 IP

Gnome 安装扩展插件(40.1版本,opensuse tumbleweed)。

剑指Offer刷题记录——Offer 07.重建二叉树

传奇游戏架设教程

Debug wechat one hop under linxu (Fedora 27)

企业或个人域名备案怎么弄

Intranet penetration server building tutorial, NPs use tutorial
随机推荐
[automated testing] - robotframework practice (III) writing test cases
剑指Offer刷题记录——Offer 03. 数组中重复的数字
Solve the problem that the unit test coverage of sonar will be 0
传奇游戏架设教程
SSH remote login service
内网穿透服务器搭建教程,NPS使用教程
[ restartedMain] o.s.b.d.LoggingFailureAnalysisReporter :
类与对象
Decipher password (comprehensive)
The use and differences of dictionaries, tuples and lists,
What if the website is hijacked?
wcdma软切换性能matlab仿真m,对比平均激活集数(MASN)、激活集更新率(ASUR)及呼叫中断概率(OP)三个性能指标
正则表达式,生成器,迭代器
What role does 5g era server play in this?
Class and super, inheritance
Minecraft bedrock BDS service tutorial
103.53.124.X IP段BGP线路和普通的专线有什么区别
m基于simulink的16QAM和2DPSK通信链路仿真,并通过matlab调用simulink模型得到误码率曲线
Commande awk du troisième épéiste - - interception
m基于Lorenz混沌自同步的混沌数字保密通信系统的FPGA实现,verilog编程实现,带MATLAB混沌程序