当前位置:网站首页>Offline installation: how to build a secure enterprise class harbor service? The content is too detailed.
Offline installation: how to build a secure enterprise class harbor service? The content is too detailed.
2022-07-18 18:46:00 【Li Dabai】
Set up a set of enterprise level Harbor service ,

1 Harbor brief introduction
HarborIt is an open source cloud native product (artifact) Warehouse , It is the first original in China 、 And becomeCNCFThe first 11 Graduate level open source projects . Users can protect artifacts through policies and role-based access control ( Such as container image 、Helm Chart etc. ), Scan the image and avoid being compromised by security vulnerabilities .
Harbor Extended open source projectsDocker Distribution, Added functions required by users ( For example, security , identity , Vulnerability scanning and management ).
Deploy in environment Harbor It can improve the efficiency of image transmission , It is convenient to build and run container applications nearby .HarborIt supports copying images between WIP warehouses 、Chart Other products , And provide advanced security functions , For example, user management 、 Access control and operation audit .\
2 Harbor Several installation methods
Harbor The following installation methods are provided , To adapt to different installation environments .
Online installation : Suitable for beginners to quickly build a Harbor Warehouse , Simple and fast , The installation process needs to pull the image from the official , Resource envelope
online.Offline installation : Suitable for the company's Intranet environment , The offline installation package contains the images required for the installation process ( Automatic import ), Resource envelope
offline.Source code installation : Suitable for developers Harbor Develop and test , Compile the source code to install locally , The installation conditions are harsh , Need to know Harbor Of the underlying principles and implementation methods , You can choose how to install the source code
Heml Chart: adopt
Hemlinstall Harbor To kubernetes colony ;Operater install :
Harbor OperatorIt provides the ability of deep customization , The user configures the top-level configurationCRD HarborCluster, Define and configure your own... According to your actual needs Harbor Components .
Each installation method can realize Habor High availability ( The high availability scheme is officially recommended to use kubernetes Installation method of , In other ways, the government does not maintain ), Prevent a single point of failure .
The high availability scheme based on offline installation is shown in official account 《Harbor The advanced combat 》 Another article on !
3 Deployment environment
operating system :CentOS-7.5\ Harbor edition :2.3.5\ Host configuration :2C、4G Memory \ host IP:192.168.2.22\ Install the software :docker-ce-19.03.8、docker-compose-2.2.3、cfssl、cfssl-json
4 Harbor Host initialization
Harbor Deployment requires a certain environment for the host , There are mainly the following points to initialize the host .
4.1 install docker-ce
Harbor No matter which way you install , Each component runs as a container , So you need to install docker-ce To start the container . What is installed here is Harbor v2.3.5, Corresponding docker The version is 17.06.0-ce+ Fine , Installed here 19.03.8 Of .
1) To configure repo Source
$ wget  https://download.docker.com/linux/centos/docker-ce.repo -O /etc/yum.repos.d/docker-ce.repo
$ yum clean alll && yum makecache
2) install docker
$ yum install -y docker-ce-19.03.8
3) start-up docker And set it to start automatically
$ systemctl start docker.service
$ systemctl enable  docker.service
4) add to docker The configuration file
$ cat <<EOF > /etc/docker/daemon.json
{
   "registry-mirrors": ["https://xcg41ct3.mirror.aliyuncs.com"],
   "exec-opts": ["native.cgroupdriver=systemd"],     #  Driver
   "insecure-registries": ["192.168.2.22:443"],   #Harbor Service URL
   "registry-mirrors": ["https://3hjcmqfe.mirror.aliyuncs.com"],   #  Mirror to accelerate
   "log-driver": "json-file",
   "log-opts": {
            "max-size": "500m",   # Definition log Maximum 500m
            "max-file": "2"     #log Maximum quantity to be retained
        },
    "live-restore": true      # restart docker Do not restart the container , be chiefly used in k8s On
}
EOF
5) restart docker service
$ systemctl start docker.service
4.2 install docker-compose
docker-compose The version of is in 1.18.0+
$ mv docker-compose-linux-x86_64   /usr/local/bin/docker-compose
$ chmod +x   /usr/local/bin/docker-compose
$ docker-compose -v
docker-compose version 1.29.2, build 5becea4c
4.3 Configure kernel parameters
$ modprobe br_netfilter     // Loading kernel modules ( temporary )
$ cat > /etc/sysctl.conf << EOF
net.ipv4.ip_forward = 1
net.bridge.bridge-nf-call-ip6tables = 1
net.bridge.bridge-nf-call-iptables = 1
EOF
$ sysctl -p
net.ipv4.ip_forward=1 : Turn on route forwarding
Do not configure this parameter , When the host restarts , The service status is normal , But can't access the server .
4.4 Download and unzip the installation package
$ mkdir  /app
$ wget https://github.com/goharbor/harbor/releases/download/v2.3.5/harbor-offline-installer-v2.3.5.tgz
$ tar zxvf harbor-offline-installer-v2.3.5.tgz -C  /app
$ ls  /app/harbor
harbor.v2.5.1.tar.gz  harbor.yml  harbor.yml.tmpl  install.sh  LICENSE  prepare

common.sh: Environment detection script , This script will be run during installation to detect docker、docker-compose、golang Whether it meets the requirements ;harbor.v2.3.5.tar.gz: Harbor Image package of each component , You can manually import to the local , The installation process will wait less !harbor.yml.tmpl: Harbor Profile template for , Based on this file Harbor Configuration file for ;install.sh: Harbor Installation script for ;
4.5 establish Harbor working directory
$ mkdir -p /app/harbor/ssl/    # Deposit harbor certificate
$ mkdir -p /app/data/   #  establish harbor Data directory ( Specify this directory in the configuration file )
4.6 Download and install cfssl Certificate making tool
Online installation , Install offline and download the installation package on the official website .
$ wget https://github.com/cloudflare/cfssl/releases/download/v1.6.0/cfssl_1.6.0_linux_amd64 \
 -O   /usr/local/bin/cfssl
$ wget https://github.com/cloudflare/cfssl/releases/download/v1.6.0/cfssljson_1.6.0_linux_amd64 \
 -O  /usr/local/bin/cfssljson
$ wget https://github.com/cloudflare/cfssl/releases/download/v1.6.0/cfssl-certinfo_1.6.0_linux_amd64   \
 -O  /usr/local/bin/cfssl-certinfo
$ chmod +x  /usr/local/bin/cfssl*      # Give these tools permission to execute
cfssljson: Will be taken from cfssl and multirootca Etc json Convert the output in format into a file in certificate format ( certificate , secret key ,CSR and bundle) For storage ;
cfssl-certinfo: Can show CSR Or details of the certificate file ; Can be used for certificate verification .
5 Make Harbor A security certificate
Use the one just installed cfssl Tools for harbor Make and issue certificates .
5.1 Generate a certification authority certificate (CA)
(1) Generate and modify CA Default profile
$ cfssl print-defaults  config > ca-config.json            # Generate default profile
$ vim ca-config.json
{
    "signing": {
        "default": {
            "expiry": "87600h"
        },
        "profiles": {
            "harbor": {
                "expiry": "87600h",
                "usages": [
                    "signing",
                    "key encipherment",
                    "server auth",
                    "client auth"
                ]
            }
        }
    }
}
default.expiry: Default certificate validity period ( Company :h)profiles.harbor: A configuration module that issues certificates for services using this profile ;
signing: signed , Indicates that the certificate can be used to sign other certificates ; Generated ca.pem In the certificate CA=TRUE;key encipherment: Key encryption ;profiles: Specifies the configuration information for different roles ; Multiple can be defined profiles, Specify different expiration times 、 Use the scene and other parameters ; Use some of the following when signing the certificate profile.server auth: Server authentication ; Express client You can use this. CA Yes server Certificate provided to verify ;client auth: Client authentication ; Express server You can use this. CA Yes client Certificate provided to verify ;
(2) Generate and modify the default csr Request file
$ cfssl  print-defaults csr  > ca-csr.json
$ vim ca-csr.json
{
    "CN": "harbor",
    "hosts": [
    ],
    "key": {
        "algo": "rsa",
        "size": 2048
    },
    "names": [
        {
            "C": "CN",
            "ST": "Beijing",
            "L": "Beijing"
        }
    ]
}
hosts: Scope of authorization included , Nodes or services not in this range will report a certificate mismatch error if they use this certificate , If the certificate does not contain, you may be unable to connect ( Here is CA The of the mechanism can be empty );Key: Specify the encryption algorithm to use , In general use rsa Asymmetric encryption algorithm (algo:rsa;size:2048)CN:Common Name,kube-apiserver Extract this field from the certificate as the requested user name (User Name); The browser uses this field to verify whether the website is legal ;CNIs the domain name , That is, you can write whatever domain name you use now ;O:Organization, Extract this field from the certificate as the group to which the requesting user belongs (Group);
(3) initialization CA
$ cfssl gencert -initca ca-csr.json | cfssljson -bare ca
2022/15/05 17:45:13 [INFO] generating a new CA key and certificate from CSR
2022/15/05 17:45:13 [INFO] generate received request
2022/15/05 17:45:13 [INFO] received CSR
2022/15/05 17:45:13 [INFO] generating key: rsa-2048
2022/15/05 17:45:13 [INFO] encoded CSR
2022/15/05 17:45:13 [INFO] signed certificate with serial number 569300079190788296339255431042064535929535986620
$ ls
ca-config.json  ca.csr  ca-csr.json  ca-key.pem  ca.pem
You can see , A new... Has been generated in the current directory ca.csr、ca-key.pem、ca.pem this 3 File . ca-key.pem、ca.pem These two are CA Relevant certificates , Through this CA To sign the server certificate .
5.2 CA to Harbor Issue certificate file
(1) Create and modify Harbor Certificate request file
$ cfssl  print-defaults csr >  harbor-csr.json
$ vim  harbor-csr.json
{
    "CN": "192.168.2.22",  #Harbor host IP
    "hosts": [],
    "key": {
        "algo": "rsa",
        "size": 2048
    },
    "names": [
        {
            "C": "CN",
            "ST": "Beijing",
            "L": "Beijing"
        }
    ]
}
(2) Use the request file according to CA Configure issuing certificate
$ cfssl gencert -ca=ca.pem -ca-key=ca-key.pem \
-config=ca-config.json \
-profile=harbor  harbor-csr.json | cfssljson -bare  harbor
$ ls
ca-config.json  ca.csr  ca-csr.json  ca-key.pem  ca.pem  harbor.csr  harbor-csr.json  harbor-key.pem  harbor.pem
$ cp harbor.pem harbor-key.pem  /app/harbor/ssl/
-config: Appoint CA Configuration file of certificate authority ;-profile: Specify the use of CA Which module in the configuration file ( here harbor Corresponds to... In the configuration file harbor);harbor.pem:harbor Digital certificate of service ;harbor-key.pem:harbor The private key of the service ;
6、 ... and 、 Offline deployment Harbor
6.1 Create and modify configuration files
You need to manually generate the configuration file according to the configuration file template .
$ cd /app/harbor     # Enter into Harbor The installation directory
$ cp harbor.yml.tmpl  harbor.yml
Modify the configuration file ( important )
$ vim /app/harbor/harbor.yml
hostname: 192.168.2.22   # This machine IP Or domain name
http:
  port: 80
https:       # Enable https Secure access
  port: 443    #Https Secure port ( Default 443)
  certificate: /app/harbor/ssl/harbor.pem    #Harbor Certificate
  private_key: /app/harbor/ssl/harbor-key.pem  #Harbor Certificate private key
data_volume: /app/data     #Harbor Data storage directory
metric:    #Metrics Components : collect Harbor Some index information of the service , Can pass Prometheus And so on Harbor Monitoring of ;
  enabled: True   # Enable Metrics Components
  port: 9090
  path: /metrics
About Harbor The detailed meaning of each parameter in the configuration file , You can see the official documents , Or you can 【
Harbor The advanced combat】 Wechat official account found , Only some necessary parameters are modified here .
6.2 perform ./prepare
$ ./prepare

Careful you must have found , The execution of the
./prepareafter Harbor There are more in the installation directory ofcommonContents and docker-compose.yml file ( It can be seen from the comparison with just decompressing ). Continue to look atcommanContents under the directory , It's not hard to see. : In execution./prepareIn the process , Will be based on harbor The configuration file of is incommonGenerate under directory Harbor Of each componentThe configuration file、Certificate of communication between components、environment variableetc. !
~ If you're executing ./prepare Will report a mistake , Please check the configuration file and the environment. There is a problem !~
6.3 function install.sh set up script
1) see install.sh Parameters of
install.sh by Harbor Installation script for , And provides 3 Install the corresponding plug-ins with installation parameters .
$ ./install.sh  -h
Note: Please set hostname and other necessary attributes in harbor.yml first. DO NOT use localhost or 127.0.0.1 for hostname, because Harbor needs to be accessed by external clients.
Please set --with-notary if needs enable Notary in Harbor, and set ui_url_protocol/ssl_cert/ssl_cert_key in harbor.yml bacause notary must run under https.
Please set --with-trivy if needs enable Trivy in Harbor
Please set --with-chartmuseum if needs enable Chartmuseum in Harbor
--with-notary: Install the image signature componentNotary( Include Notary Server and Notary Singer), You have to configureHTTPSTo specify this parameter ;--with-clair: Install the image scanning tool Clair;(2.3.1 Have been abandoned );--with-trivy: Install the image scanning tool Trivy;--with-chartmuseum: install Char File management component ChartMuseum;
2) perform ./install.sh install harbor
$ ./install.sh --with-notary --with-trivy --with-chartmuseum
stay install.sh The execution will go through the following process :
(1) call common.shScript checkdocker、docker-compose、golangVersion number of 、 Whether the installation is in line with the installation environment ;(2) Import / Pull the mirror image ; (3) According to the mirror image , Use docker The container that runs each component ; (4) start-up Harbor Every component in ( service );

6.4 View service status
see Harbor Whether the service status of each component is normal !
$ docker-compose ps

NAME Column : Harbor Component service name of ;
COMMAND: start-up Harbor Commands for components ;
STATUS: Harbor Status of component services (running normal );
harbor-exporter Component is just enabled in the configuration file metrics Component monitoring service .
7、 ... and 、Harbor Simple application of
7.1 Command line login Harbor
If the client wants to use Harbor service , You need to have docker Environment and in docker Specified in the configuration file of harbor The address of .
1) adopt insecure-registries Parameter assignment Harbor Address !
$ vim  /etc/docker/daemon.json

{
   "registry-mirrors": ["https://xcg41ct3.mirror.aliyuncs.com"],
   "exec-opts": ["native.cgroupdriver=systemd"],
   "insecure-registries": ["192.168.2.22:443","lidabai.harbor.com:443"],
   "registry-mirrors": ["https://192.168.2.22:443"],
   "log-driver": "json-file",
   "log-opts": {
            "max-size": "500m"
        }
}
2) Command line login Harbor
$ docker login https://192.168.2.22:443 -u admin -p Harbor12345
-u Appoint Harbor Username (admin For Super Administrator );
-p Specify the user's password ; 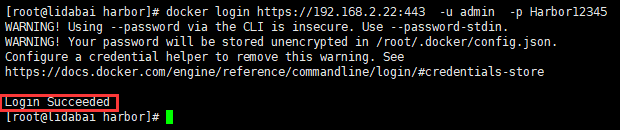
PS: Command line push / Pull Harbor The image in is not described in detail here , If you are right about docker Have some understanding , I believe this is not a problem !
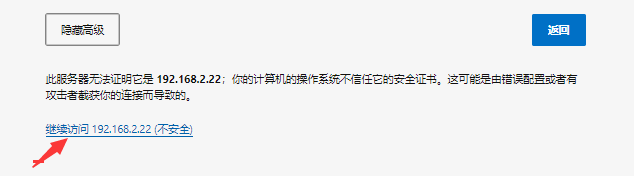
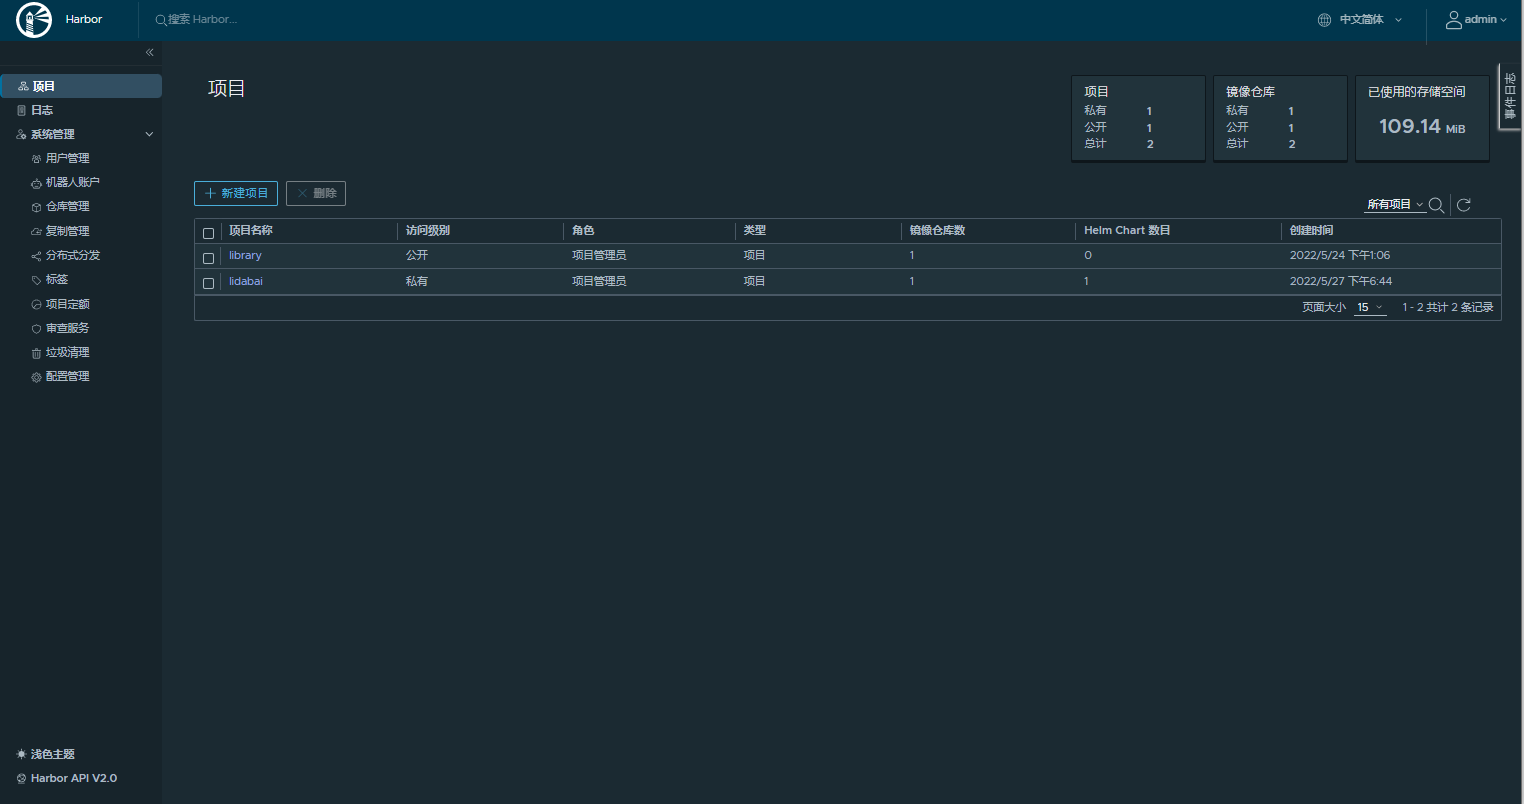
Browser login Harbor UI Management interface
Type in the browser harbor Host name and port number , Enter the user name ( Just installed admin Super administrator user ) And password ( The default is Harbor12345) 

summary
This article shares in detail the offline installation package , Deploy secure in an enterprise environment Harbor The server . From the operation to the principle is described in detail , If you are right about Harbor Backup of 、 upgrade 、 monitor 、 Image migration 、 Interested in high availability solutions , Official account 【Harbor The advanced combat 】 To read , If you encounter problems during operation , Please leave a message !
边栏推荐
- 学习路之PHP--post获取不到请求数据
- MySQL笔记: B站宋红康最新教程(持续更新中)
- 【C语言刷LeetCode】539. 最小时间差(M)
- Software testing interview questions: briefly describe what is static testing, dynamic testing, black box testing, white box testing α Testing β Testing?
- Huawei equipment RF resource management command
- Flask response
- 让我们自定义反射系统
- uCOS-III学习笔记——时间片轮转
- 标准输入输出流
- Error :Could not decode ... With “UTF-8“-encoding. Editing not possible
猜你喜欢

ZABBIX monitoring service (IV) configuration trigger

Impala advanced settings of broadcast_ BYTES_ LIMIT

The principle and implementation of ring queue

Sword finger offer 52 The first common node of two linked lists

2022 latest Tianjin Construction Safety Officer simulation question bank and answers
离线安装:如何搭建安全的企业级Harbor服务?内容太过详细。

thingJS的使用
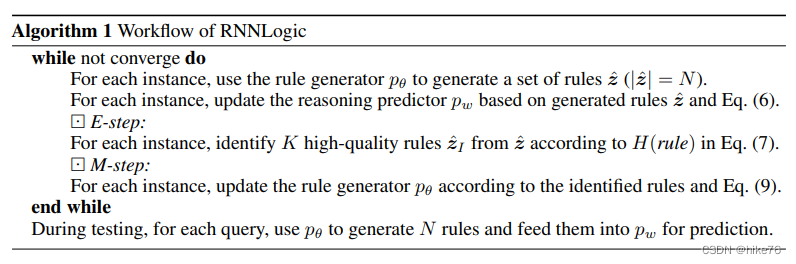
论文翻译解读:learning logic rules for reasoning on knowledge graphs【RNNLogic】

UPUPWANK柚皮安装SSL证书指南

【Ucos-III源码分析】——信号量
随机推荐
web开发从入门到精通一(详细)
重写equals为什么要重写hashcode
[product people Wei Peng] 13 design websites necessary for product people in 2022 (version 1.0)
[graduation project] network public opinion hotspot analysis system based on Emotional Analysis
华为设备配置射频调优
ERROR: Could not install packages due to an OSError: [ Errno 2] No such file or directory: ***
环形队列的原理以及实现
【Ucos-III源码分析】——任务创建
The principle and implementation of ring queue
Cloud native (XXXV) | Prometheus introduction and installation
Anaconda 的认识以及和它相关的一些编辑器的简单介绍
腾讯四面面经,问傻了
scrapy-redis分布式爬虫部署
Error :Could not decode ...With “UTF-8“-encoding. Editing not possible
Sweep redis distributed crawler deployment
【Ucos-III源码分析】——内存管理机制
zabbix 监控服务 (四)配置触发器
thingJS的使用
自定义类型——结构体
golang中的读写锁原理